Mother's Day Rivet Round Up

rivetroundup.png

Mother’s Day is less than two weeks away and most stores are still closed for quarantine. And, well, that makes shopping for Mother’s Day a little more challenging. But whether you need to shop for a special mom in your life or send a hint to your significant other, we’ve got you covered. In today’s blog, we rounded up nine of our favorites from Amazon’s Rivet brand. (This isn’t a sponsored post. We just like their stuff.)

If you are like us, you are spending a whole lot of time at home and feeling the urge to update a few things. Here are nine items that could help make your home just a little more homey for Mother’s Day—or any day of the year. Enjoy!

  1. Tufted Velvet Accent Chair

  2. Maxwell Washed Stripe King Duvet Set

  3. Mid-Century Diamond Cut Concrete Lamp

  4. Mid-Century Stoneware Planter

  5. Modern End Table

  6. Industrial Throw Pillow

  7. Mid-Century Swivel Sconce 

  8. Modern Hand-Woven Fringe Throw 

  9. 18-Piece Stoneware Dinnerware Set 

Easy DIY Entryway

ACS-0358.JPG

When we moved into our house nearly five years ago, we placed a coat tree near our front door and it stood there for the next four years. In the winter, coats, hats, bags, and gloves would sometimes get hung on the hooks, but mostly they’d just get thrown on top of the thing, resembling a comical clothing topiary of sorts. It drove me bananas. Also, I should probably mention that we DO have a coat closet in our front hall, but everyone (including me) is too lazy to actually hang coats in there. I mean, first you have to open the door, then find a hanger, then put the coat on the hanger, then stuff it in between all the other coats, then close the door. Obviously that’s way too much work.

So, I searched for some inspiration on Instagram and found a DIY entryway with wainscoting and hooks that I loved. Then, last summer, I decided to try to convince my husband, Matt, that we NEEDED this entryway in our lives. Thankfully, he agreed. So, off we went to the hardware store for supplies.

Here’s what we bought:

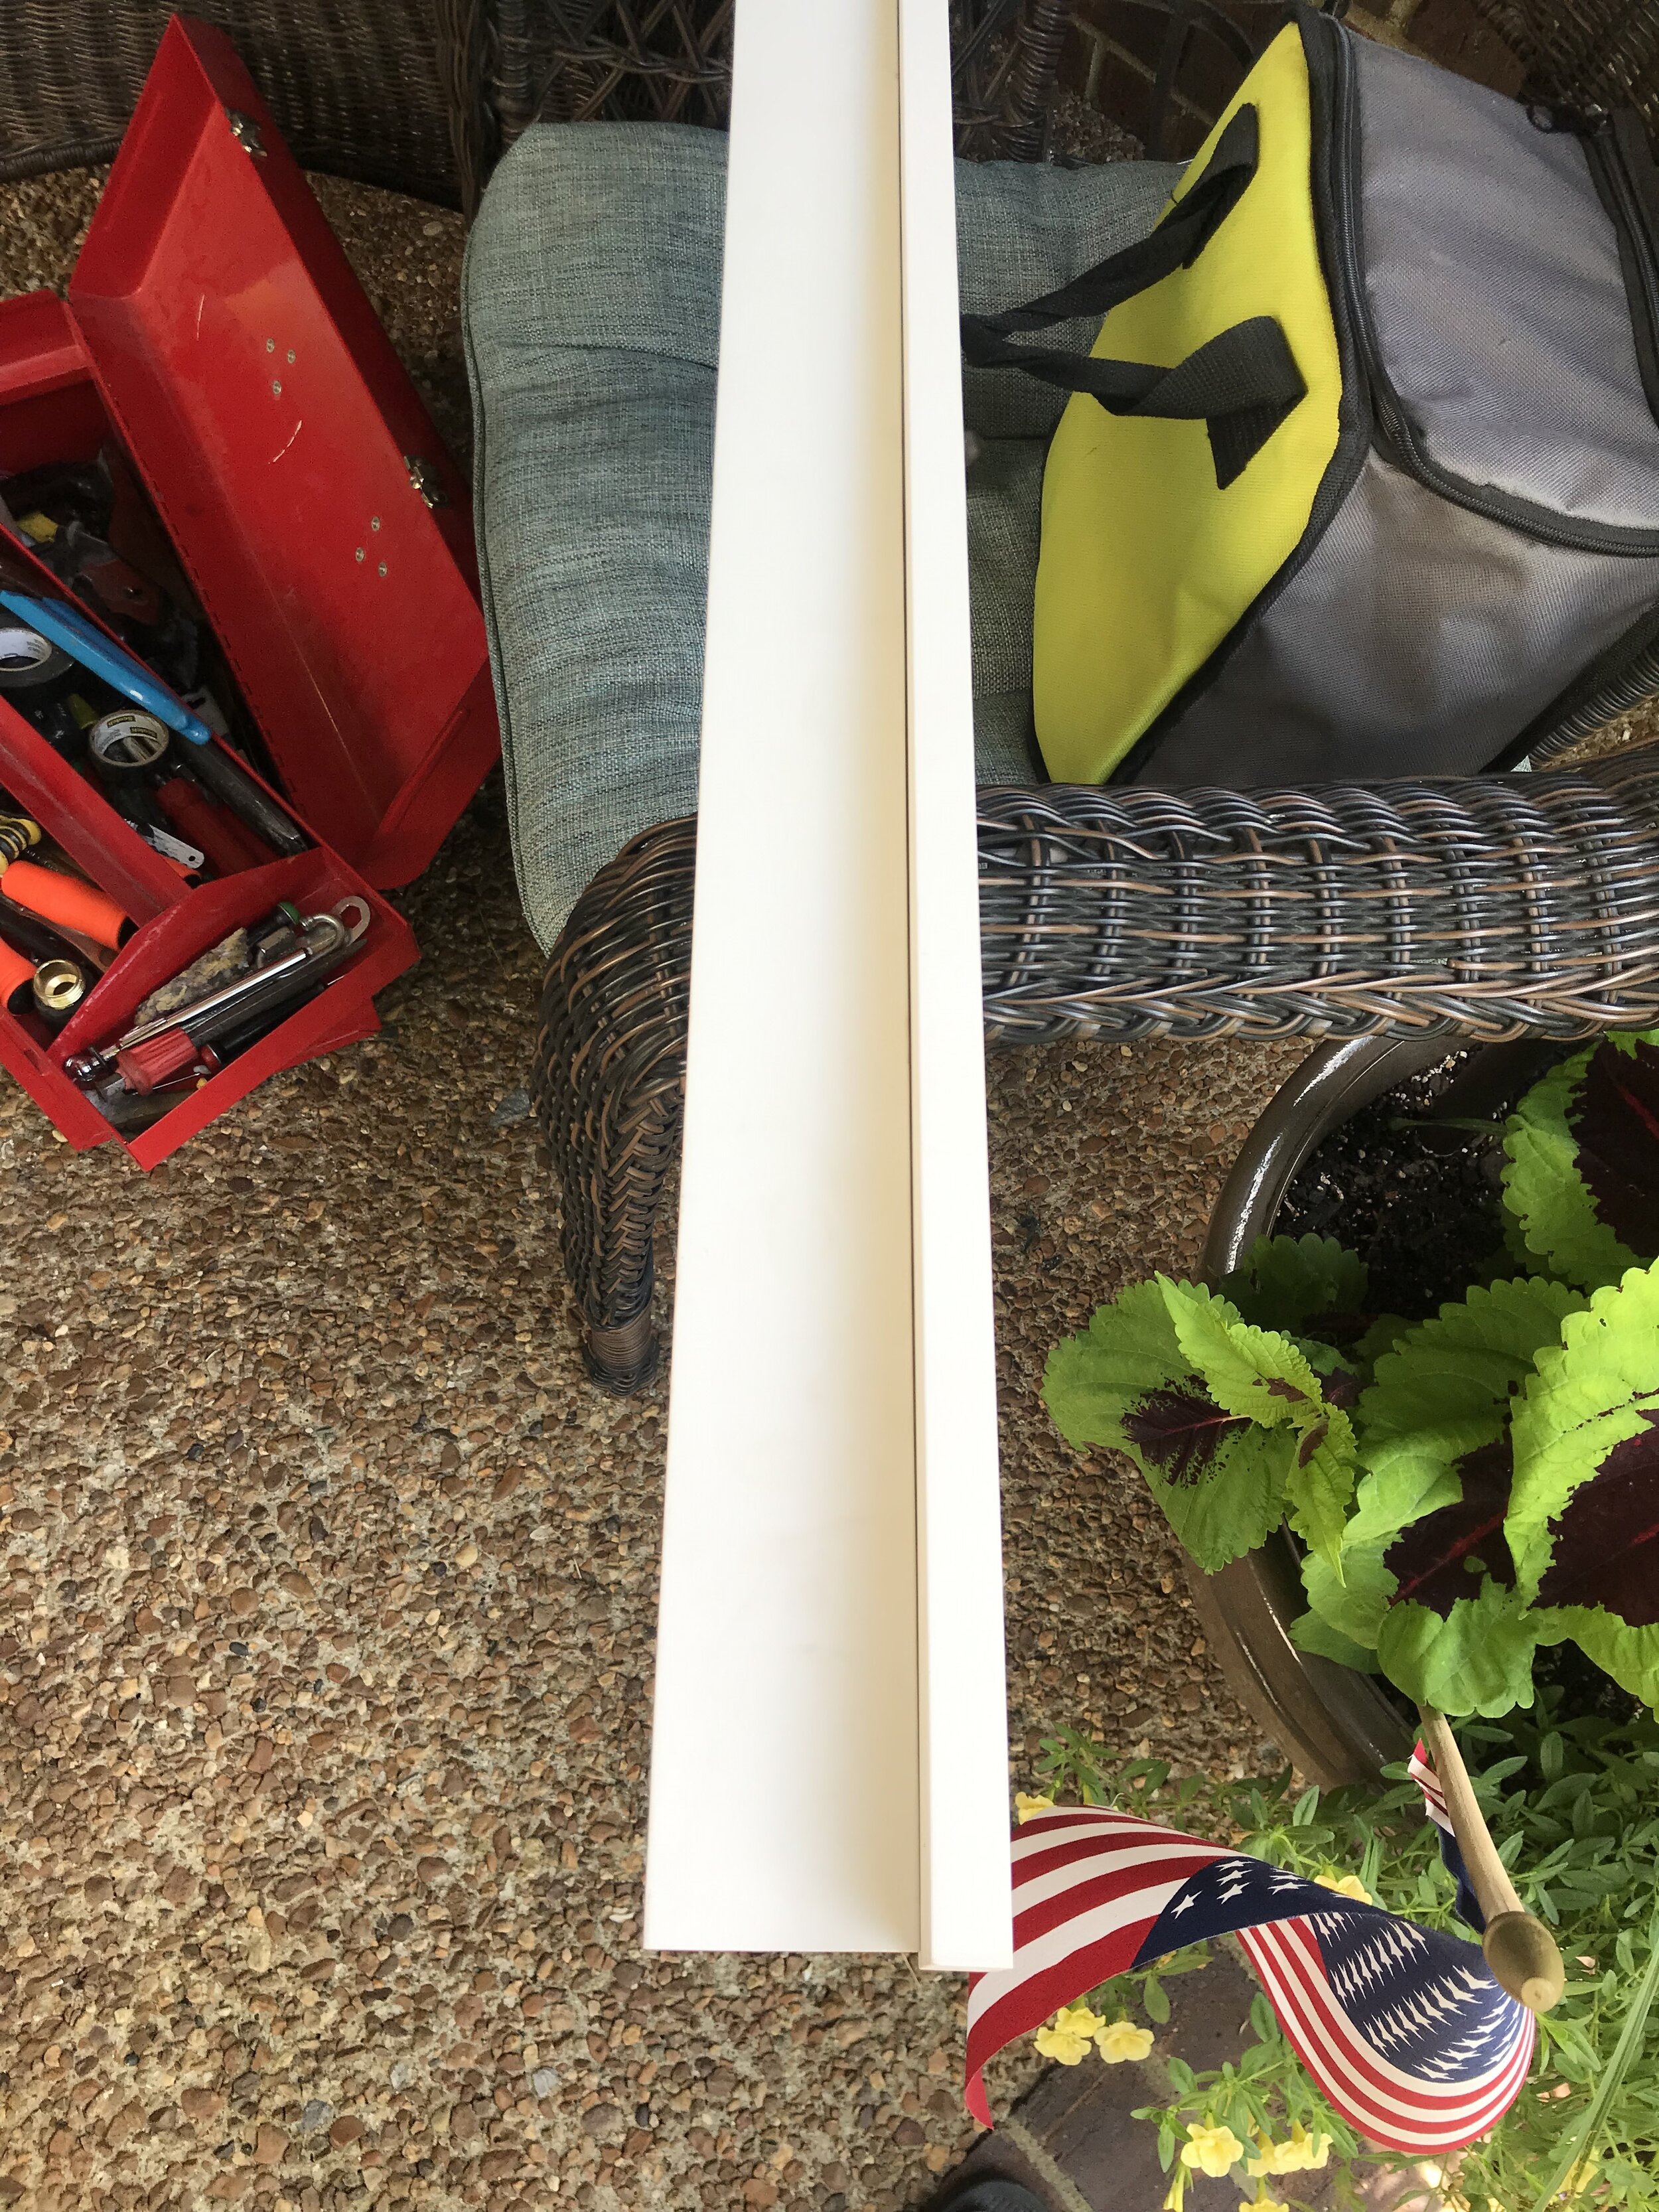
  • 2 Lattice strips, cut to 54” each

  • 1 piece of 2 3/4” x 3/4” wood

  • 1 piece of 1 1/2” x 3/4” wood

  • Liquid Nails (or something similar)

  • Wood screws (we already had)

  • Wood filler (we already had)

  • caulk (we already had)

  • Paint (we already had)

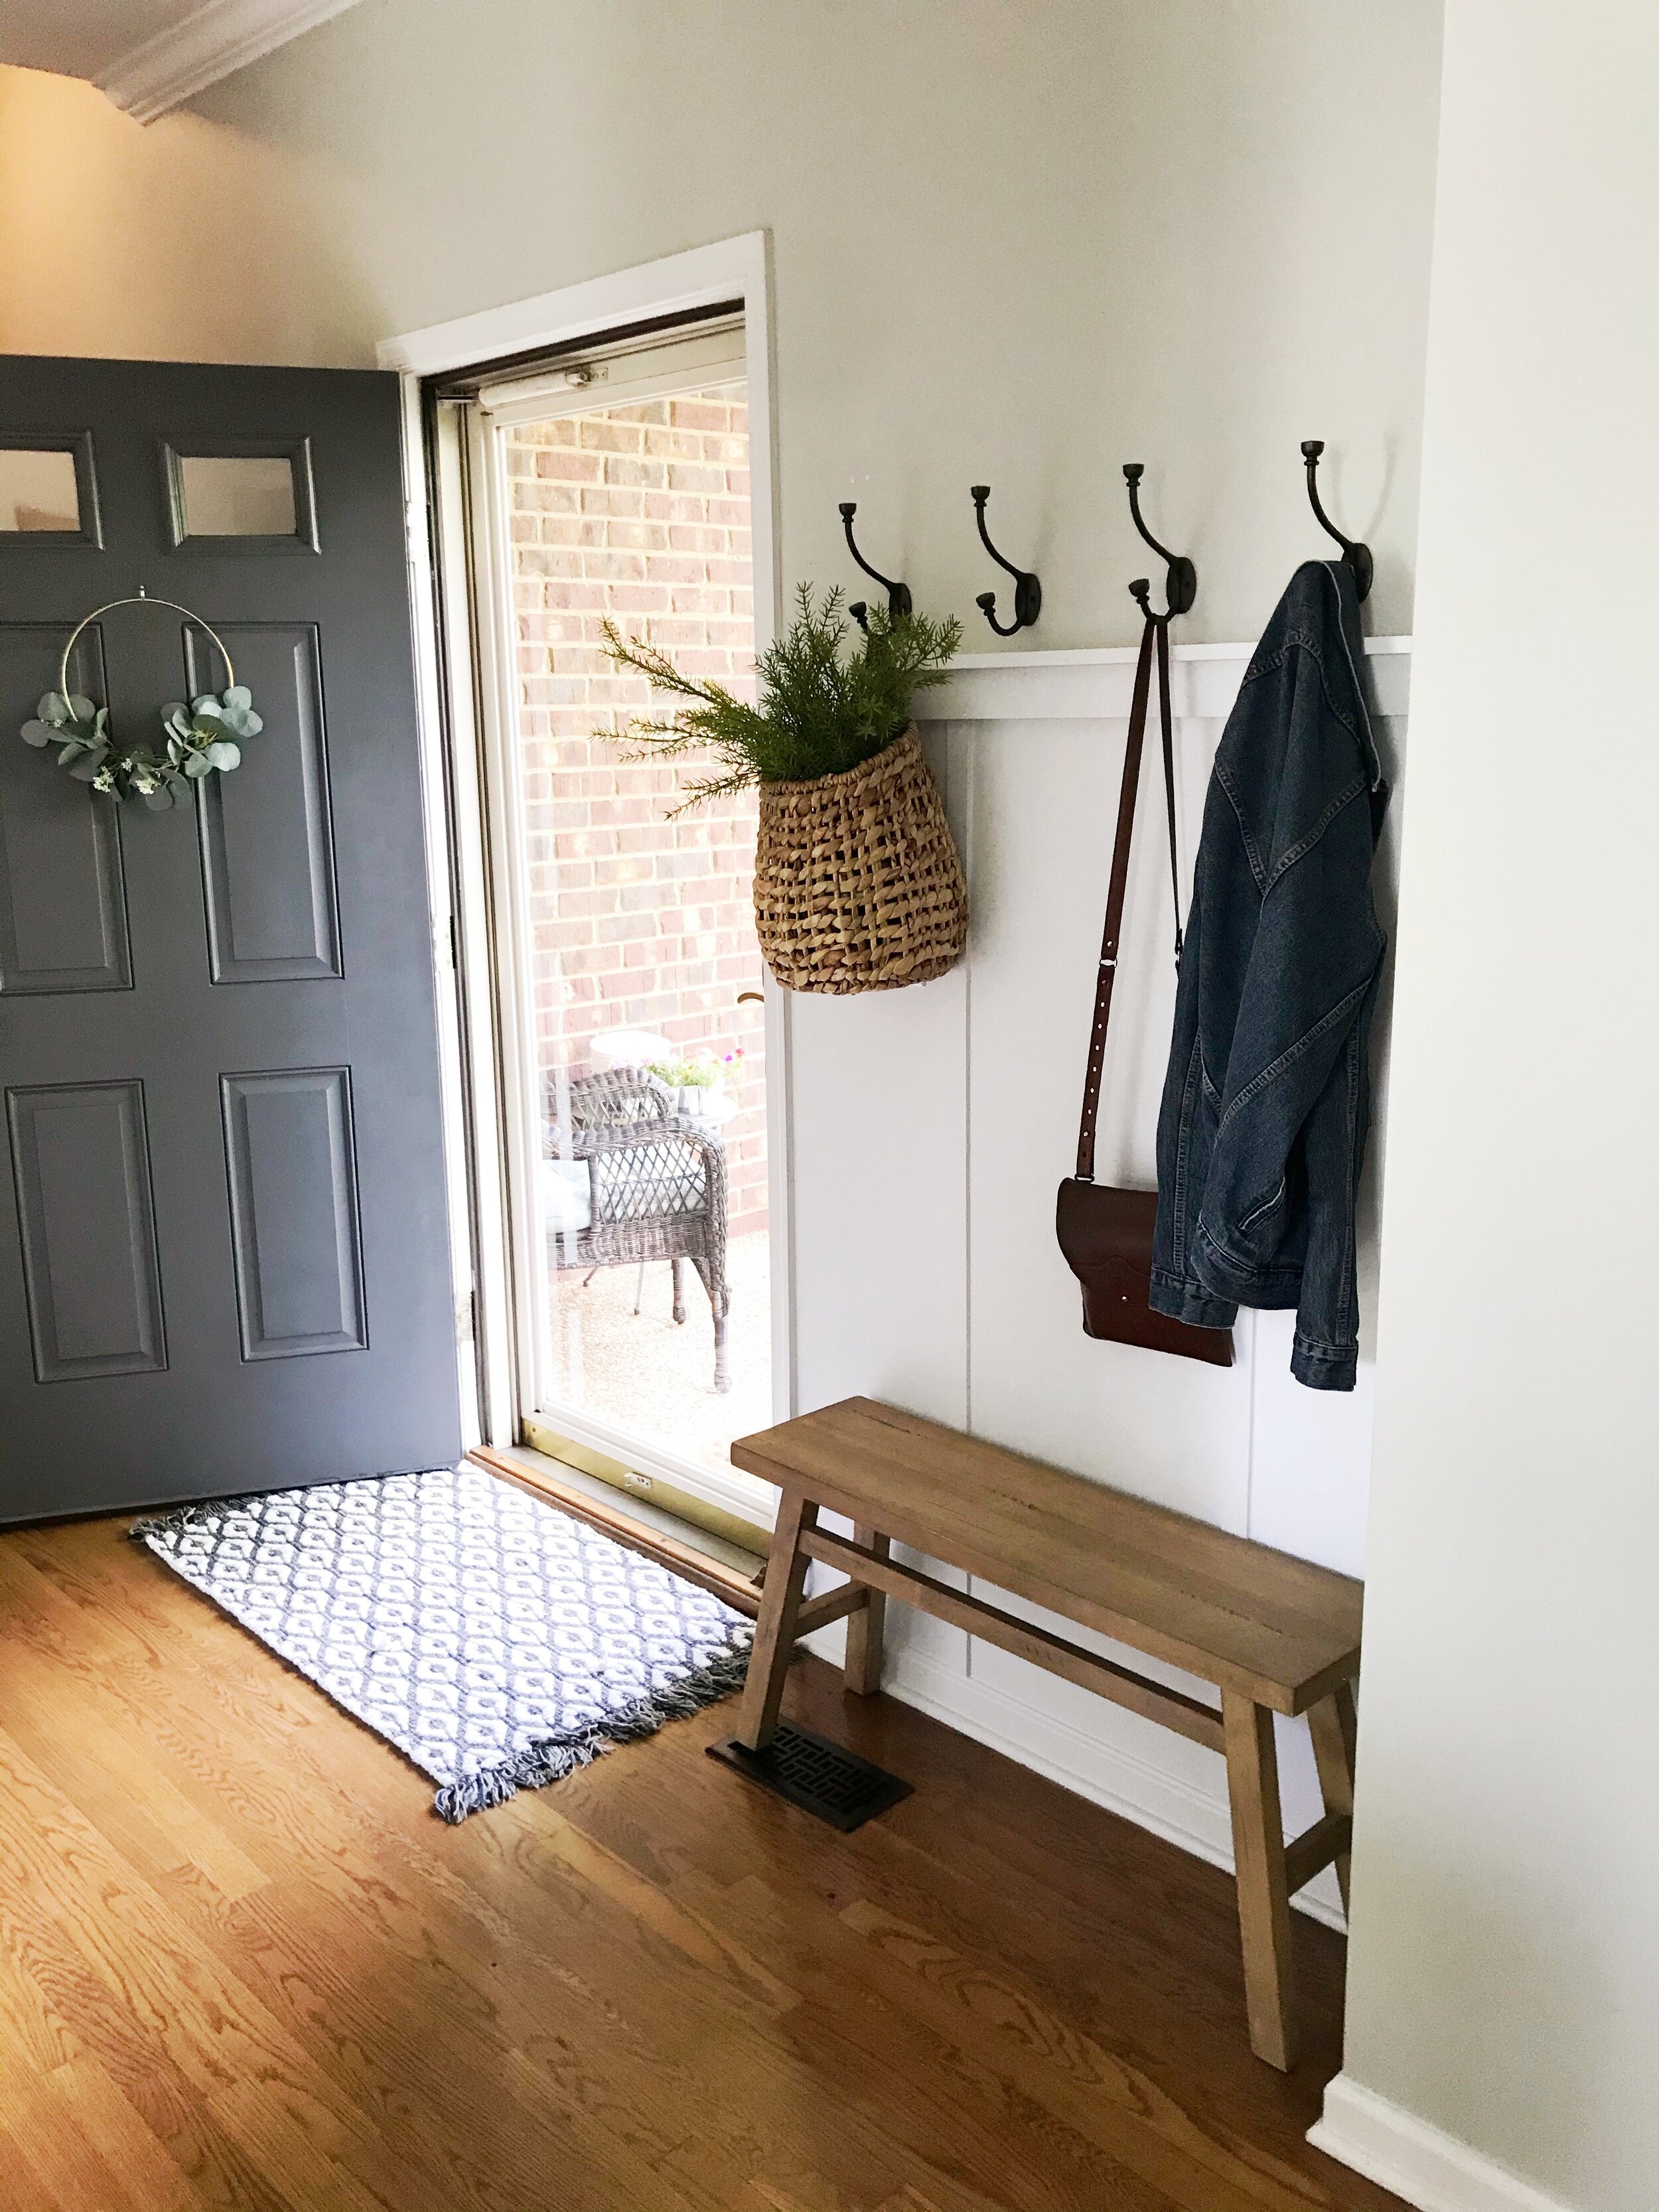
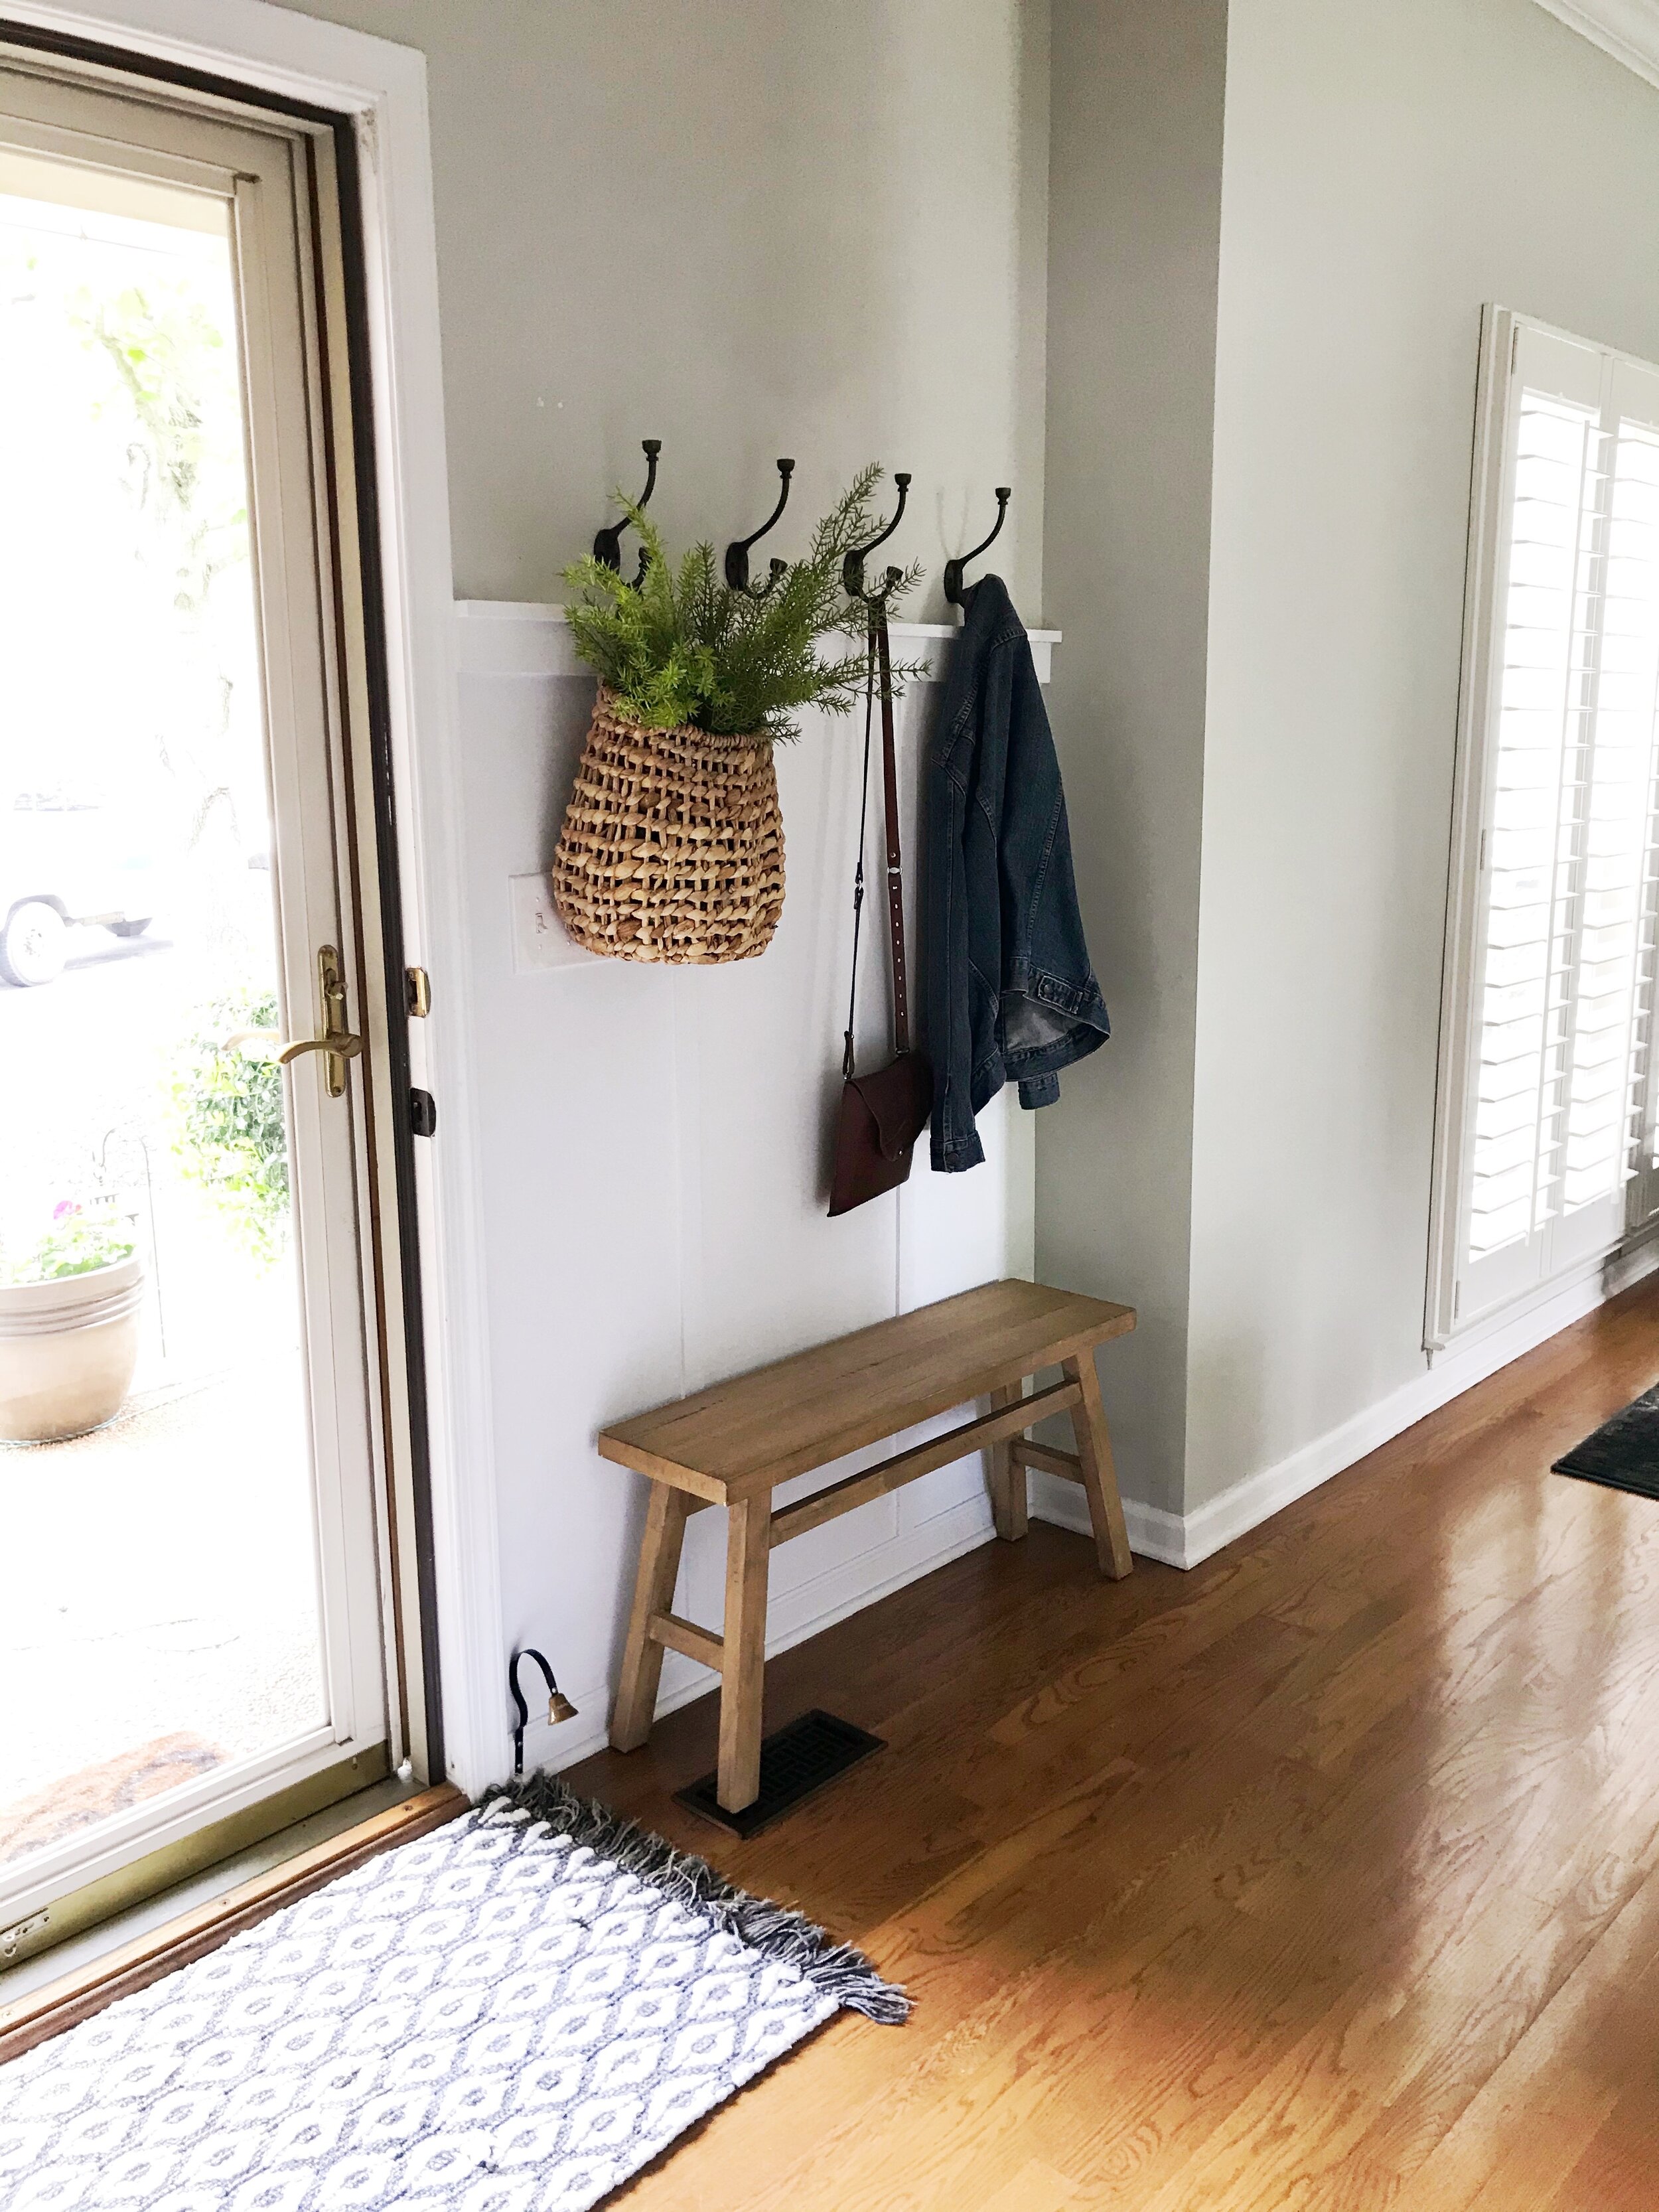
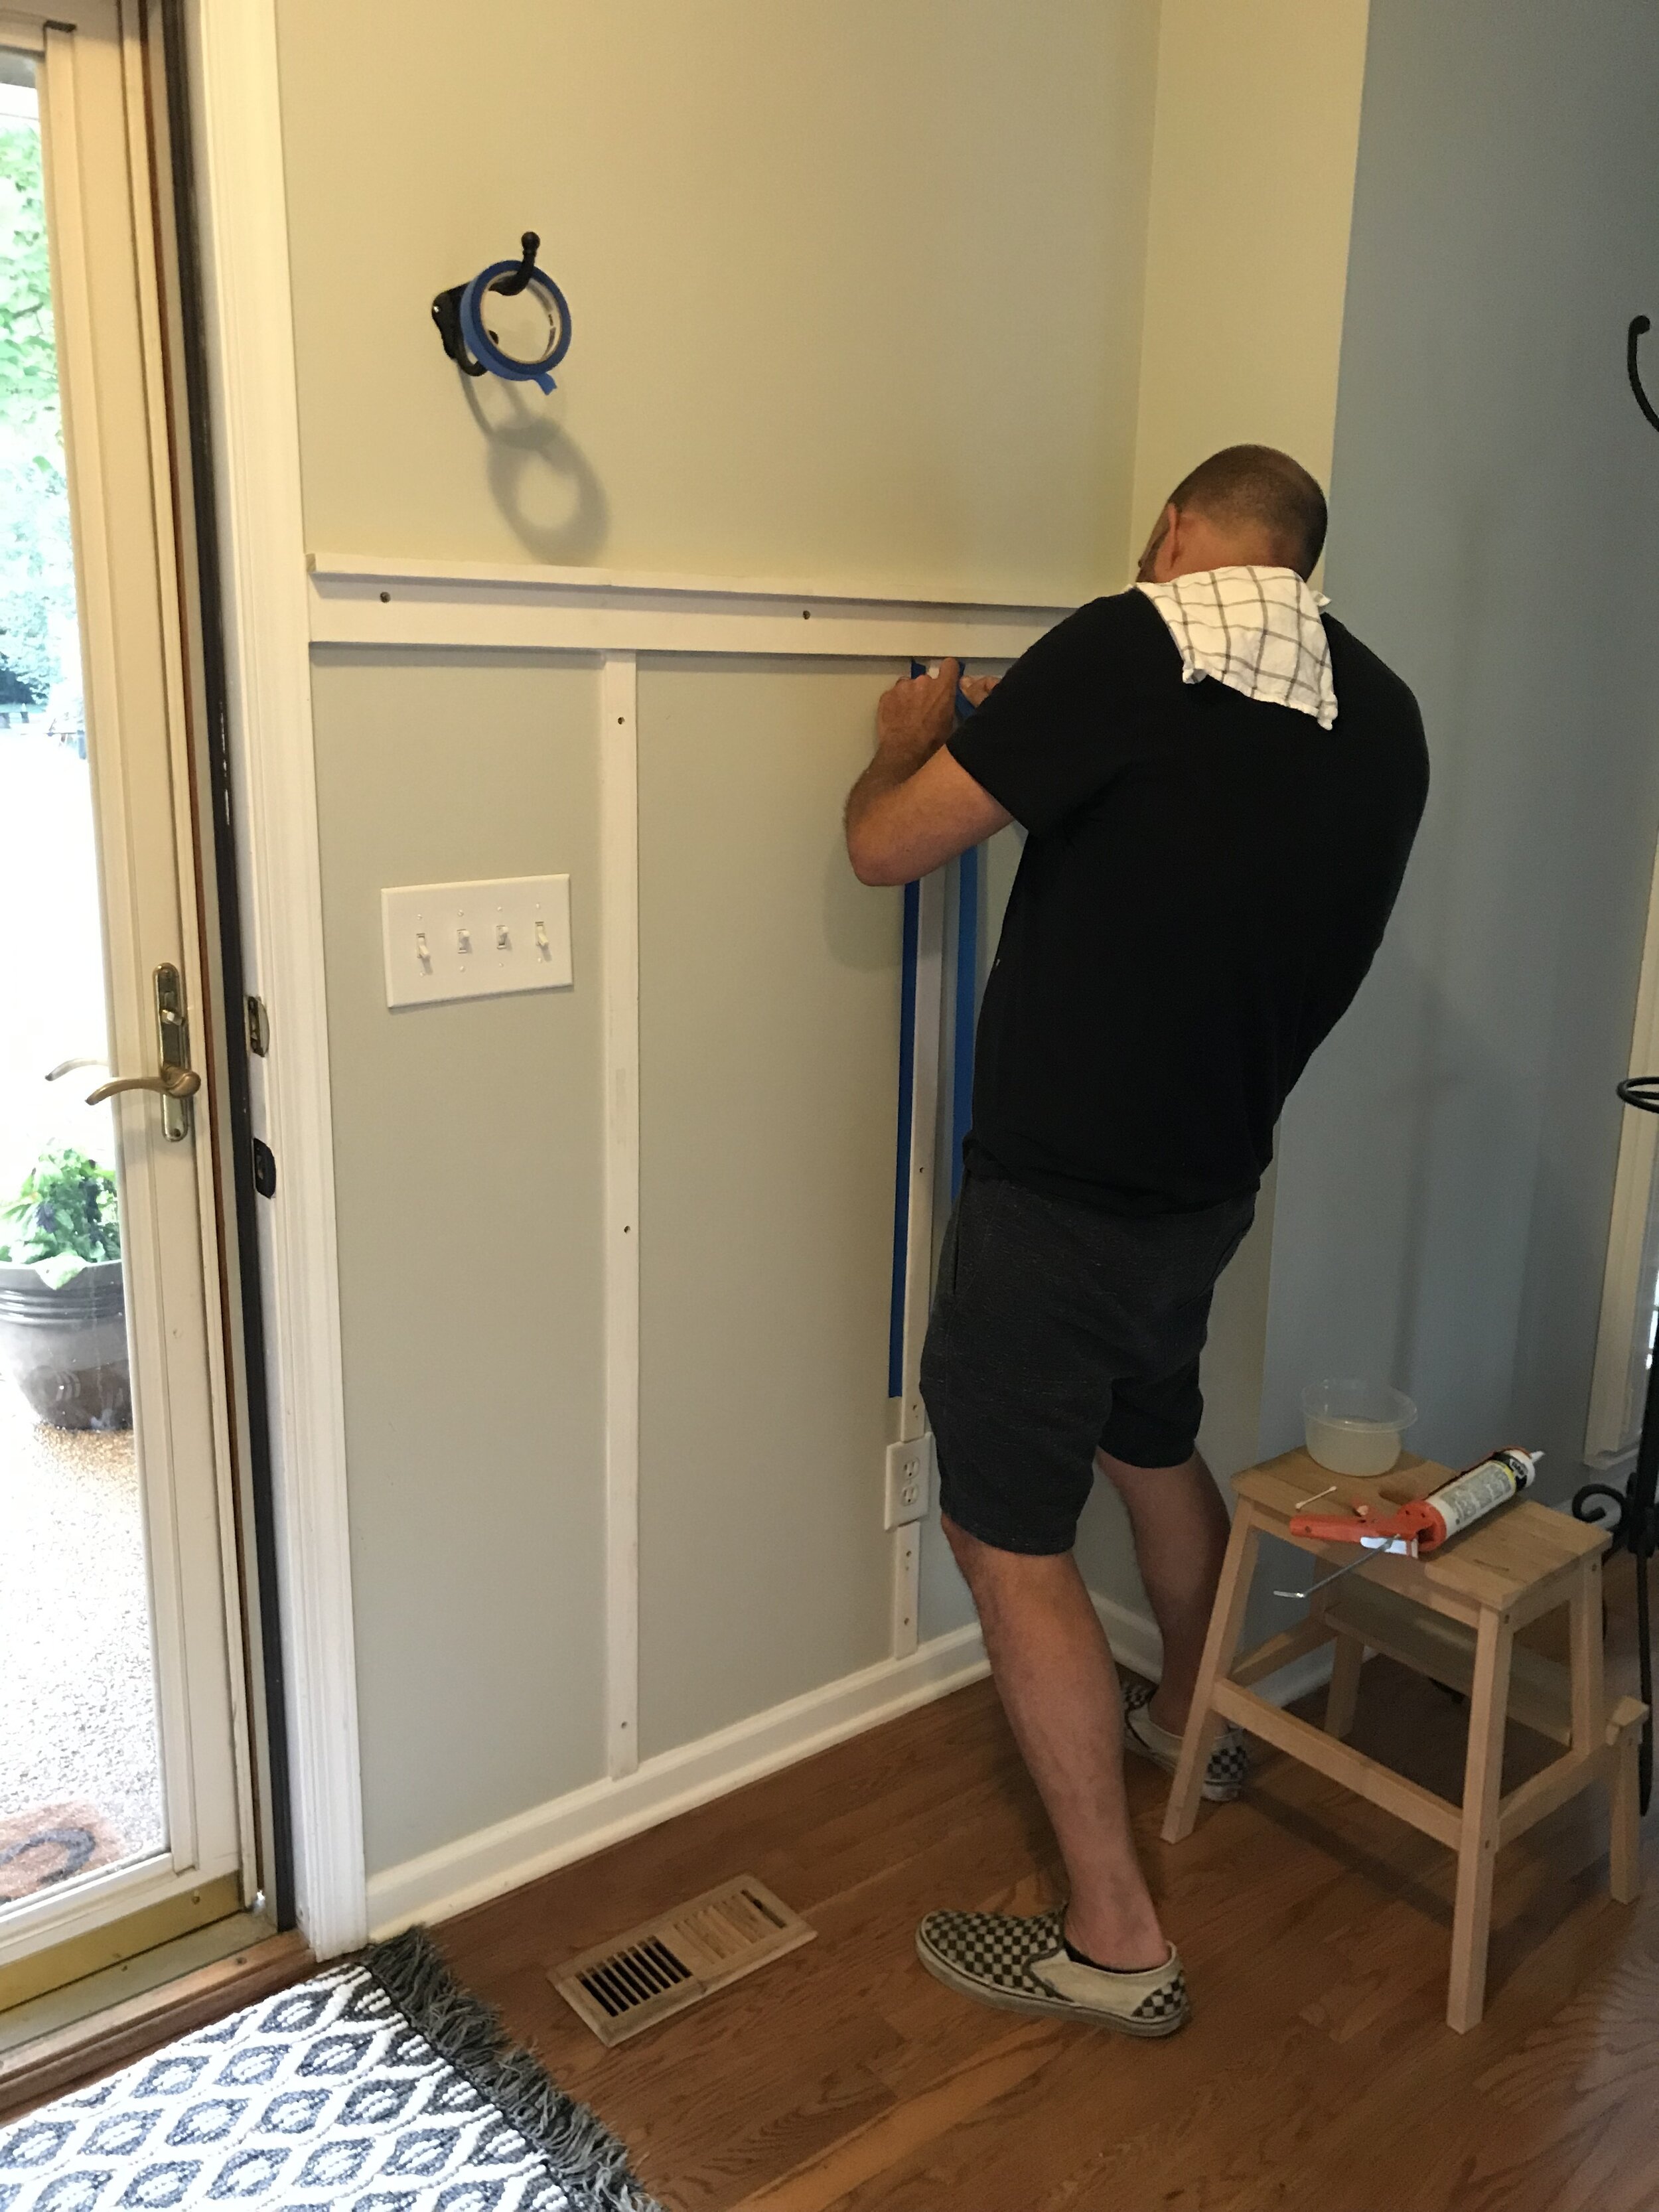
First, Matt started by making the top piece of the wainscoting. We decided that it would sit about 5 feet off the ground so that my youngest son could still sort of reach the hooks once they were placed on the wall. He cut a section of the 2 3/4 x 3/4 inch wood and placed it flat against the wall. Then, he placed the 1 1/2 x 3/4 inch piece of wood on top of it, creating a little ledge. Then, he drilled screws into the top piece of wood down through the larger piece of wood to create the shelf. He then screwed the entire piece into the wall in three places to create the top of the wainscoting. (I should probably note that he did countersink the holes so that we could fill them with wood filler and paint over them.)

Once that top ledge was in place, it was time to move on to the lattice strips. Some people prefer to use wood here instead, and we did buy wood initially, but I felt it stuck out too far and didn’t look right because we had an electrical outlet to work around. So we opted for the lattice instead. Next we had to decide how to space our lattice on the wall. For me that was easy because I wanted the lattice to run exactly center on top of and beneath the outlet instead of off center. So that told us how far out from the right side of the wall the first piece of lattice would need to go. Then we simply copied that measurement from the left side of the wall (or front door frame). To work around the outlet, we simply cut out the length of the outlet from the lattice and put the shorter piece beneath it and the longer piece above it. We used Liquid Nails and wood screws to hold the lattice in place.

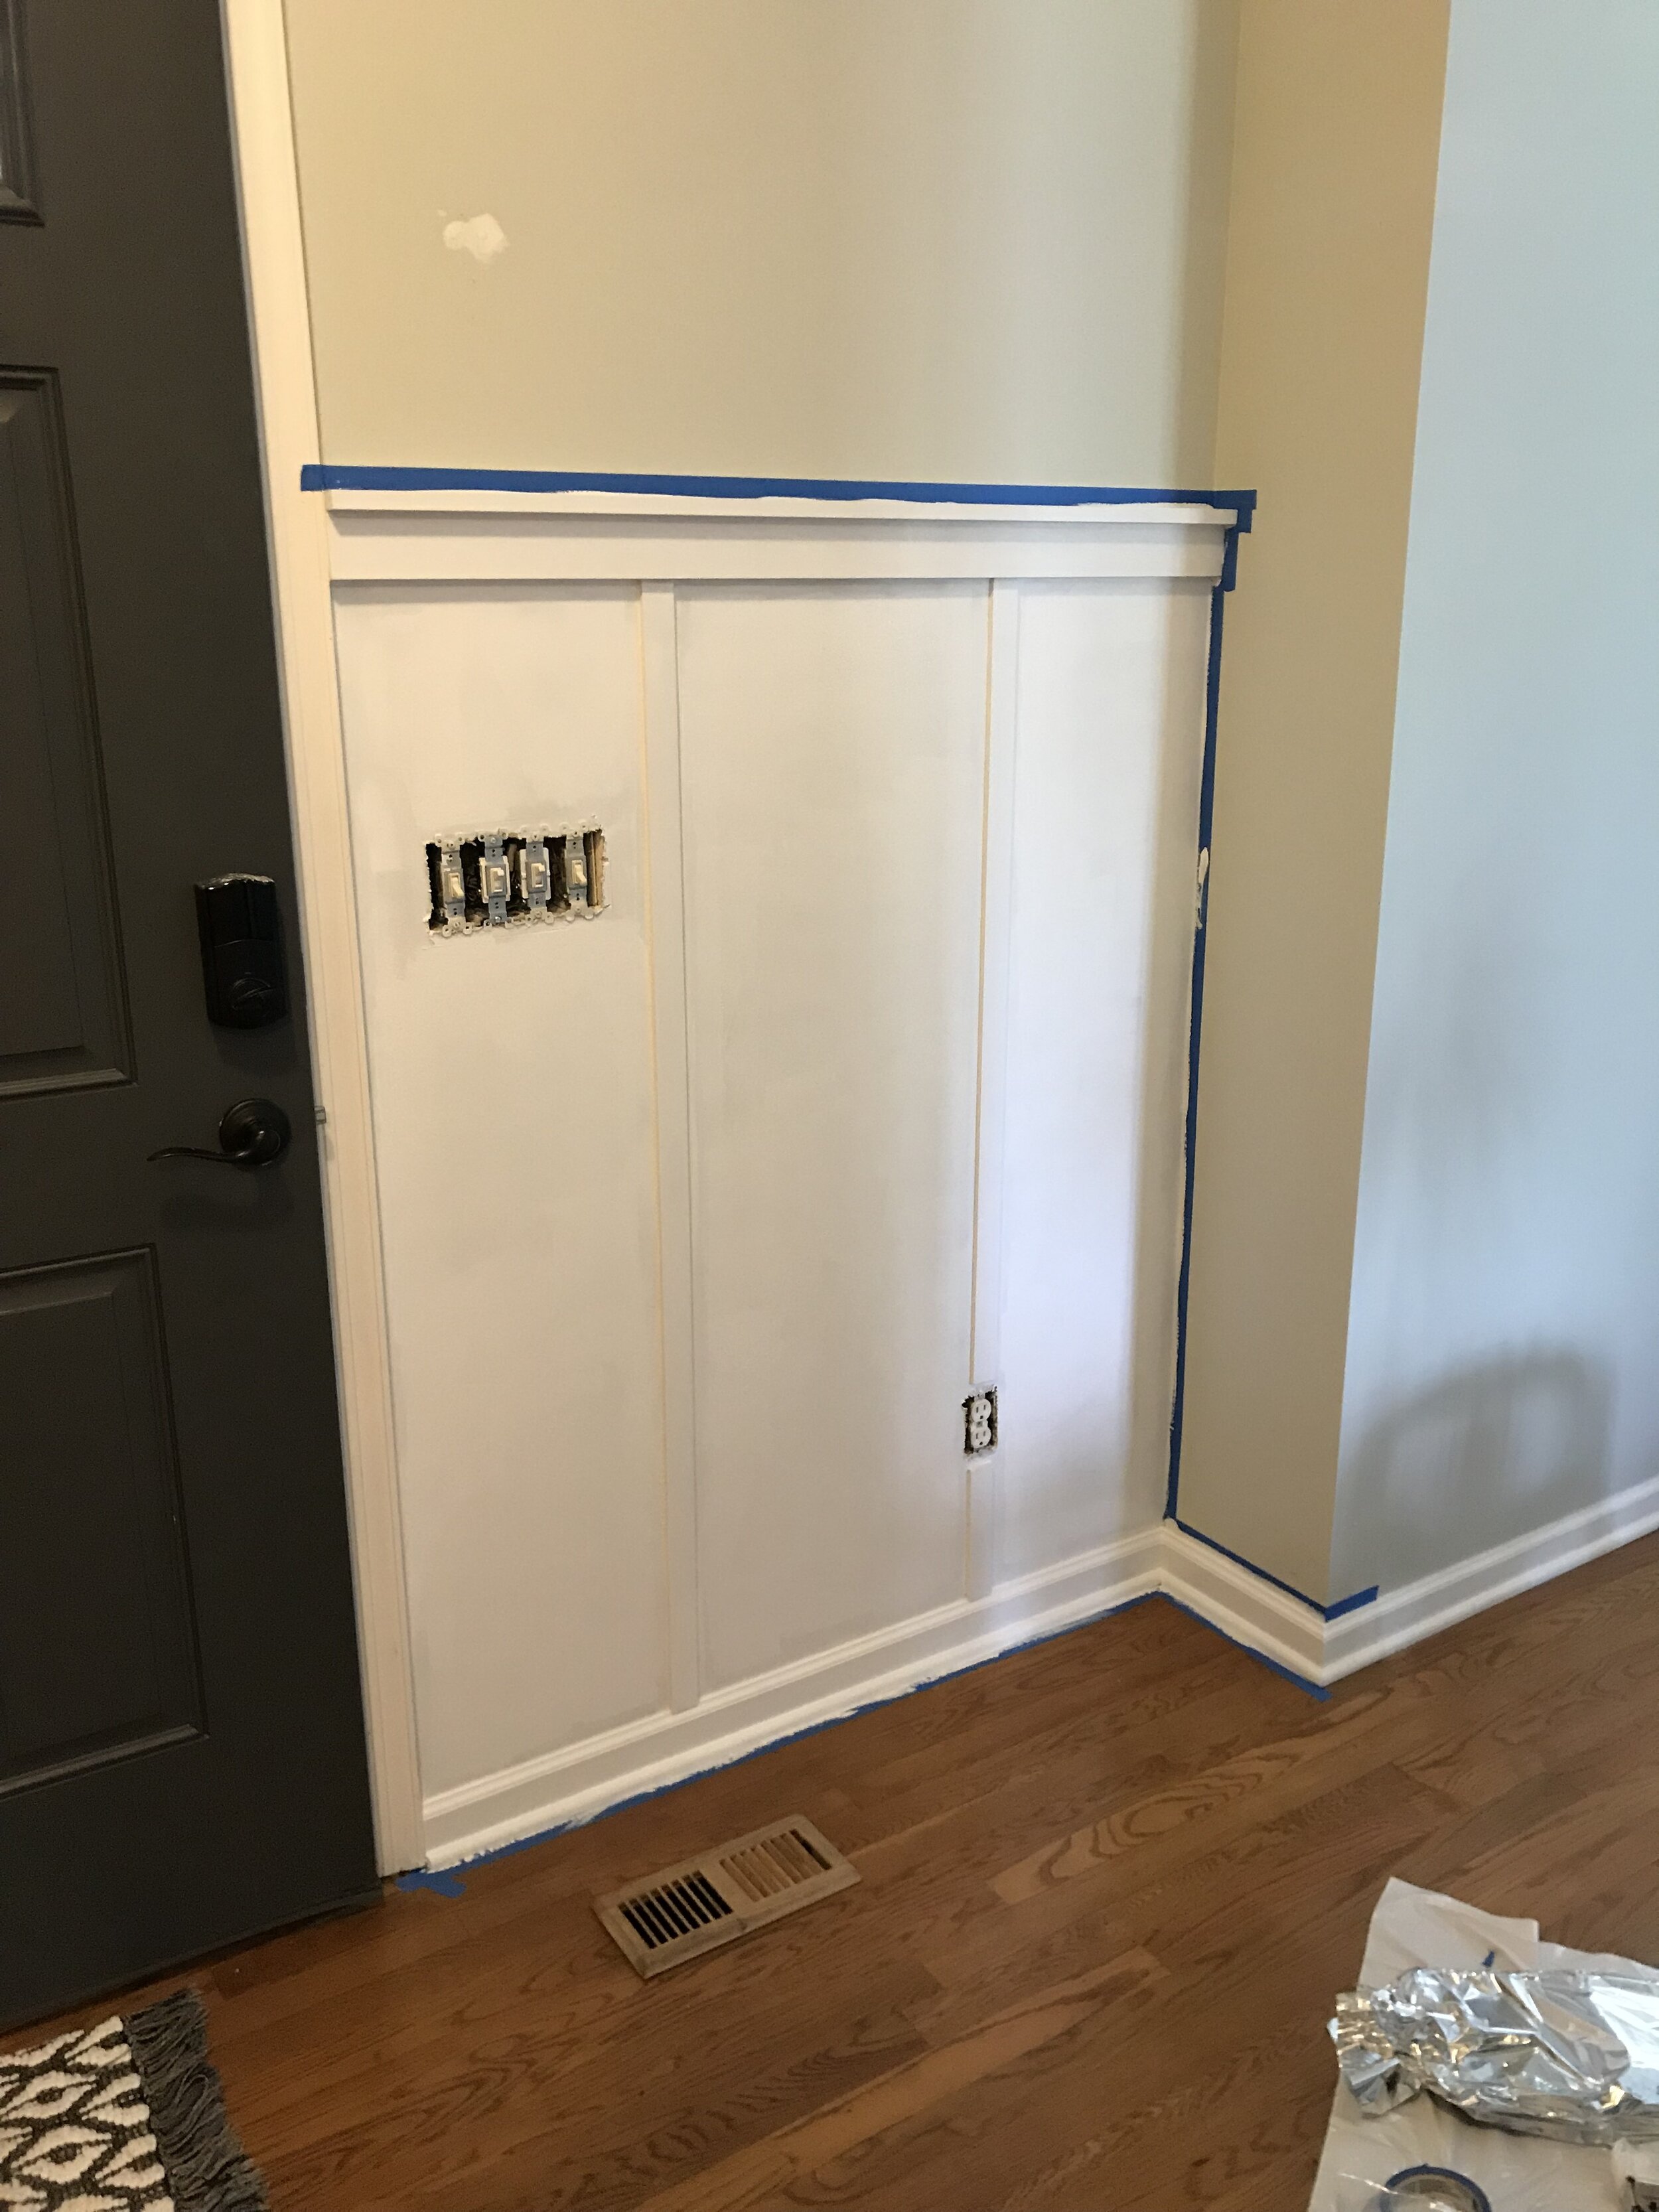
Once the wainscoting was finished, we caulked all of our seams and then it was time to paint. I taped off my walls and put two coats of Benjamin Moore Super White on the top ledge, walls, and lattice.

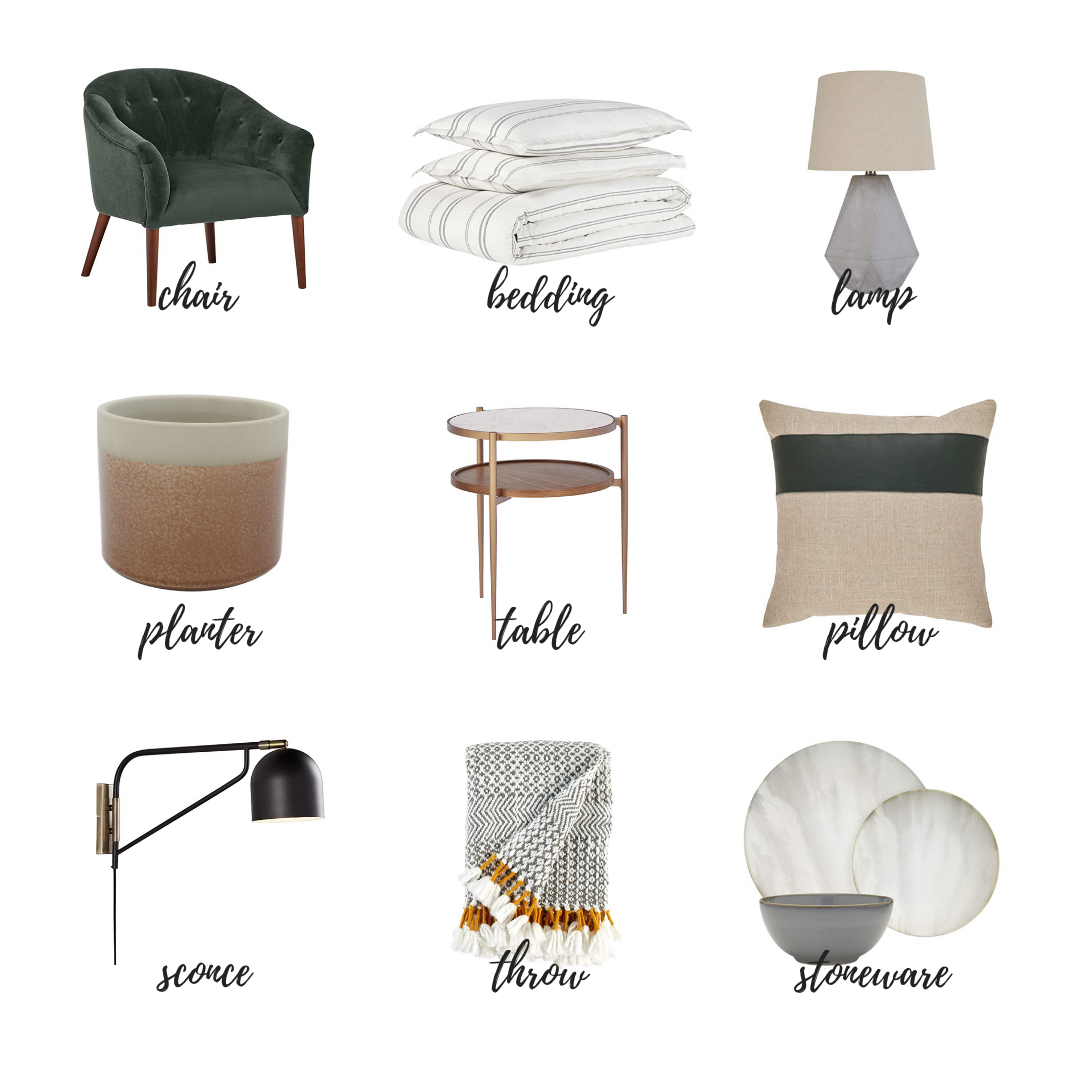
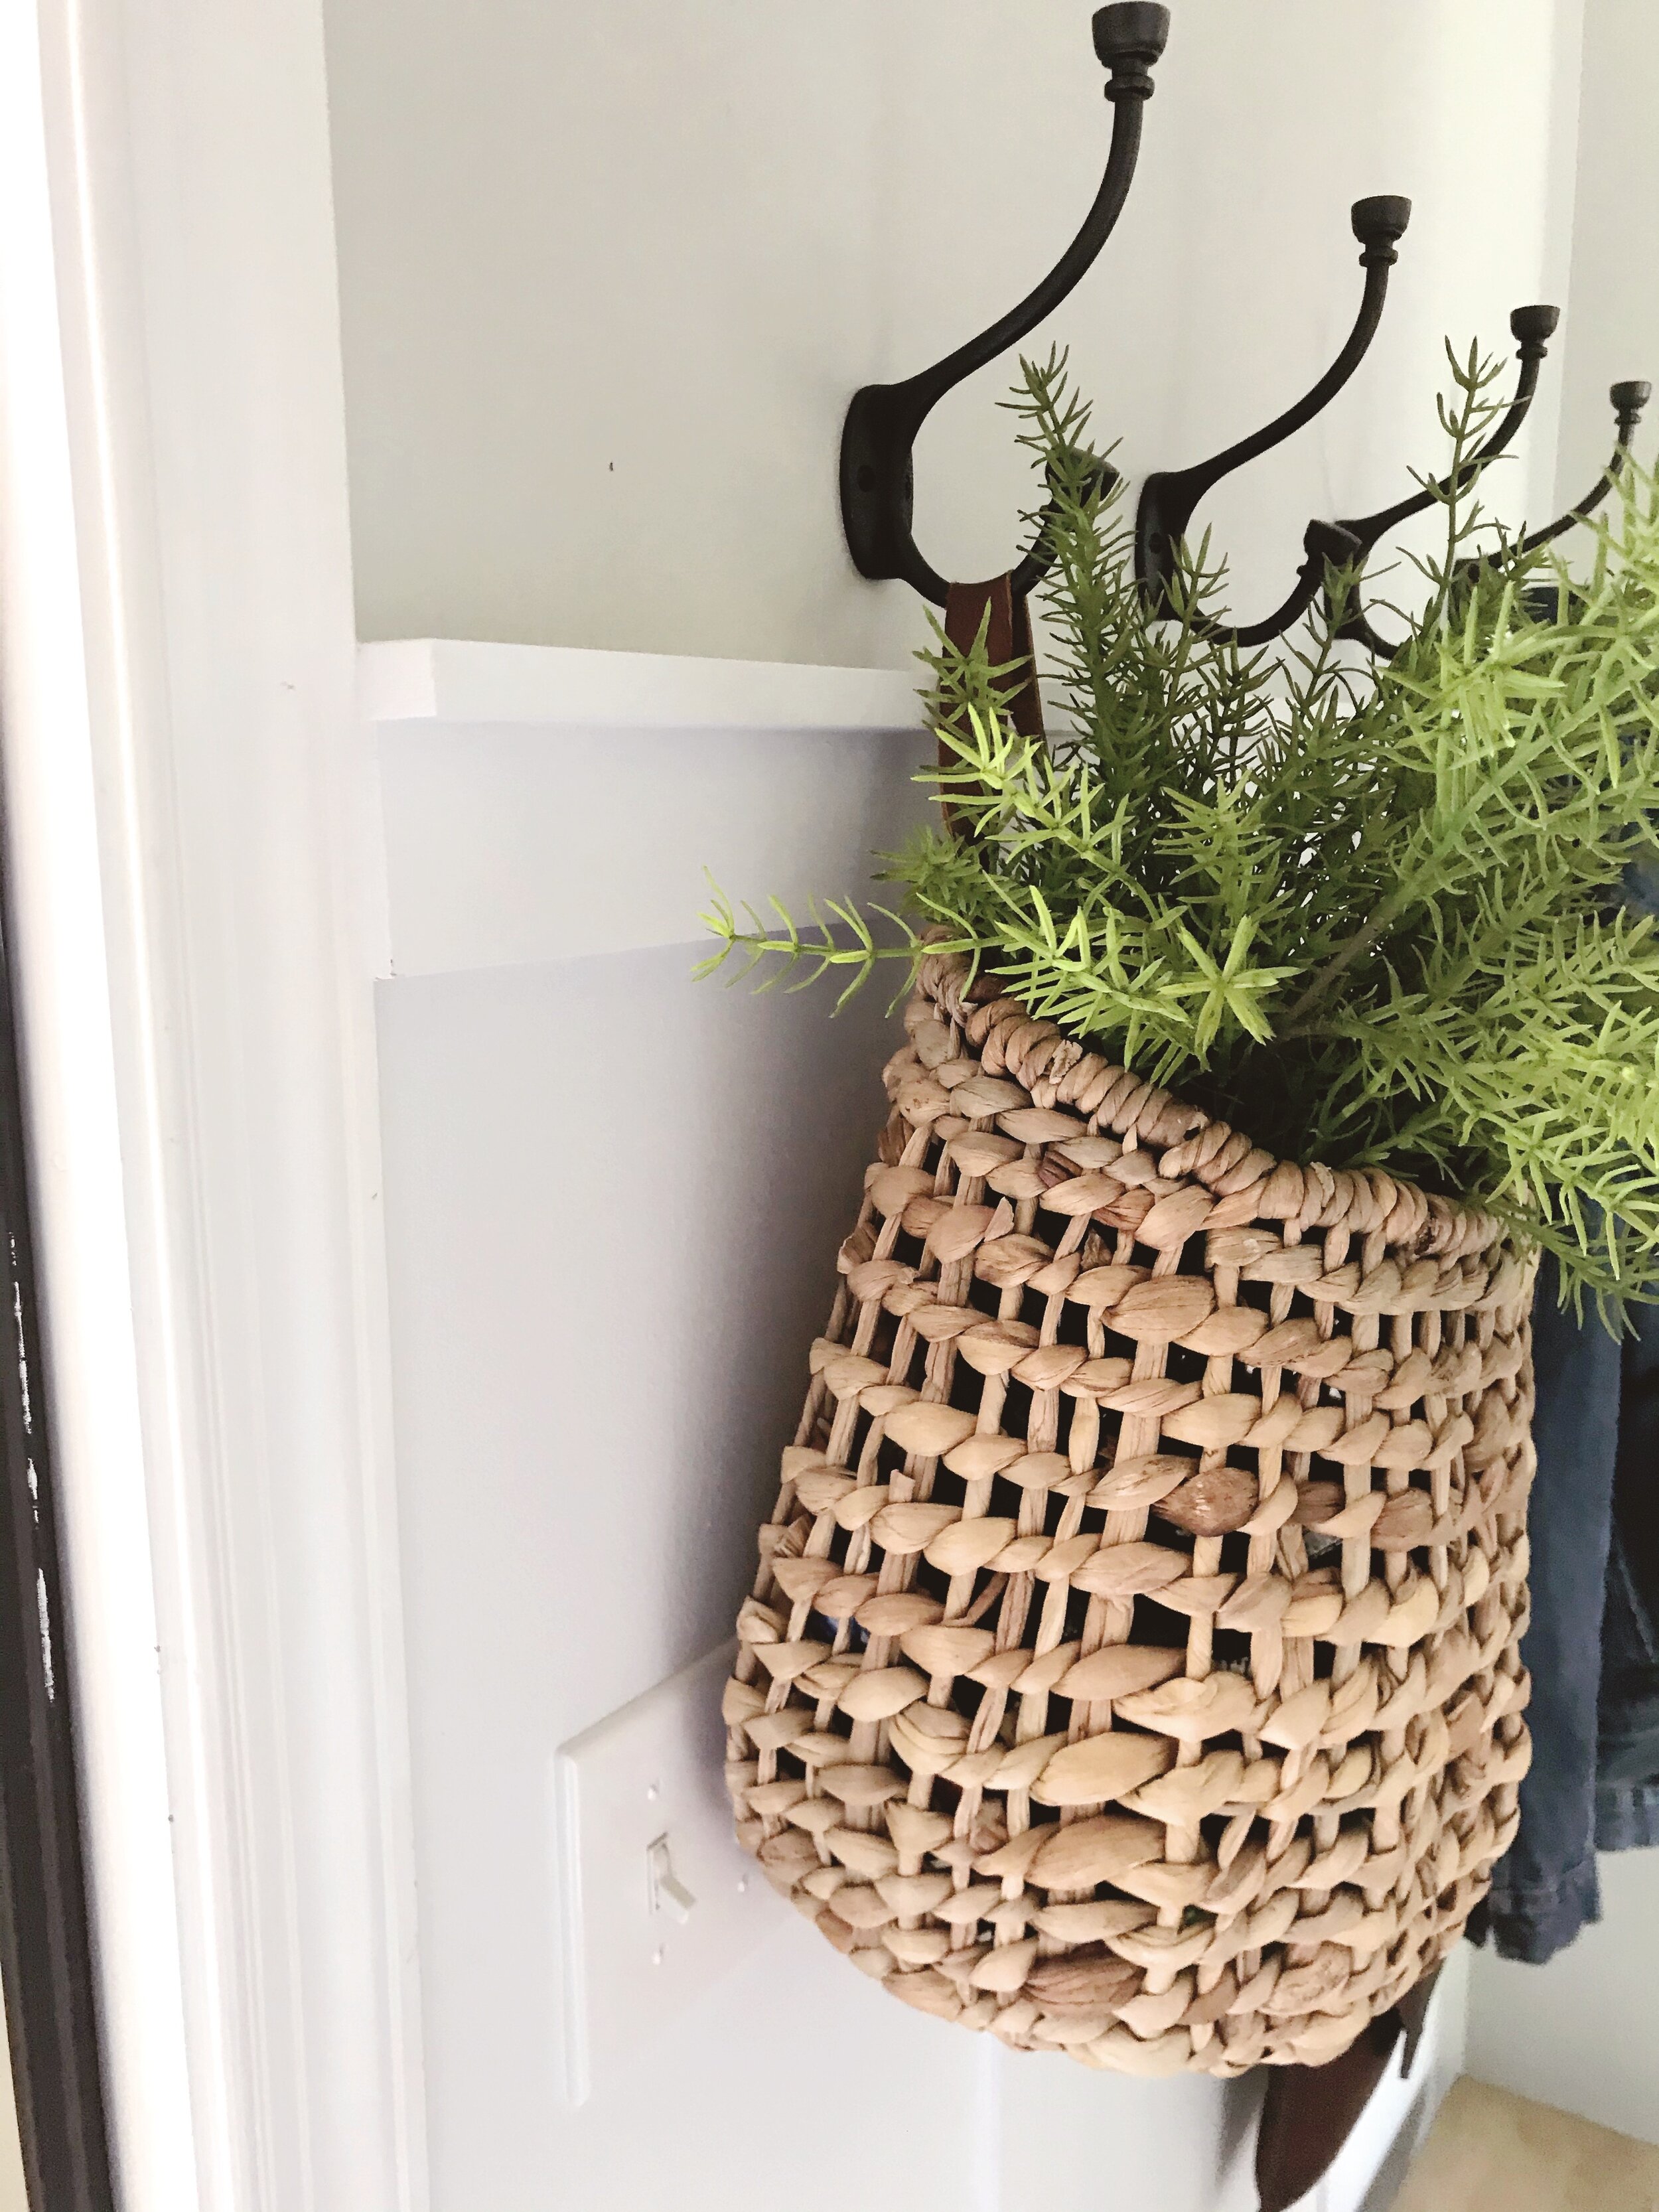
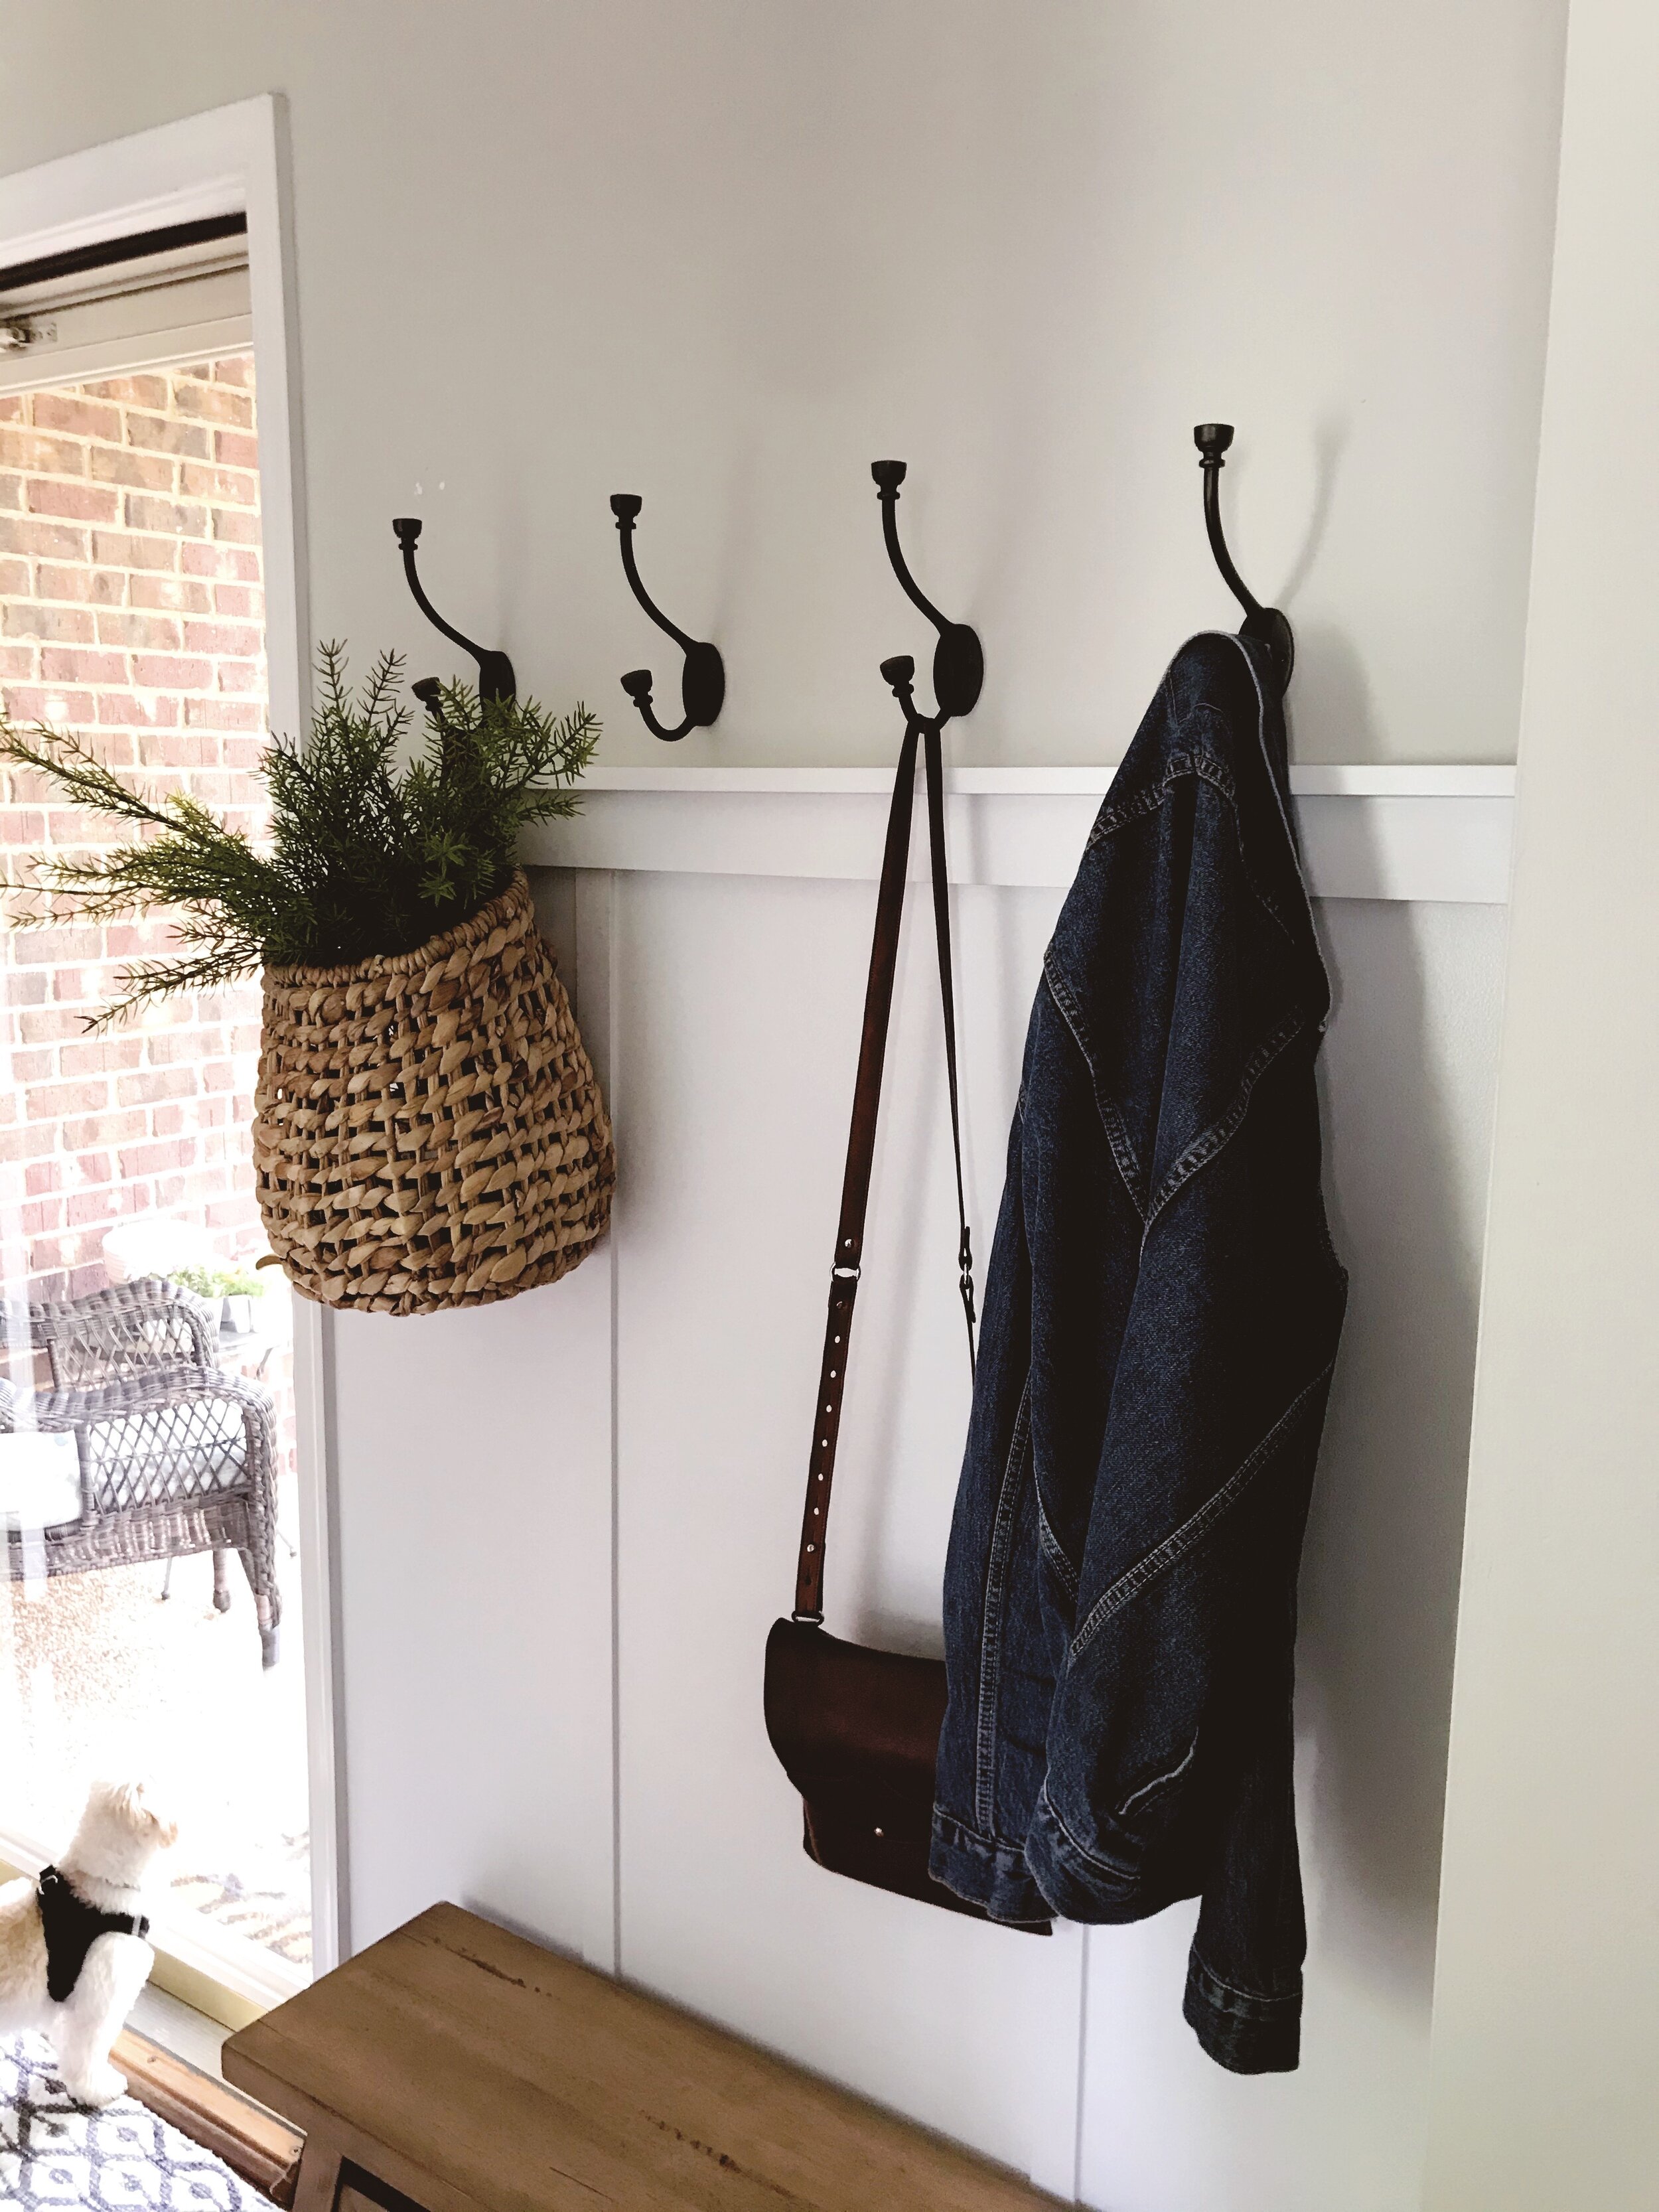
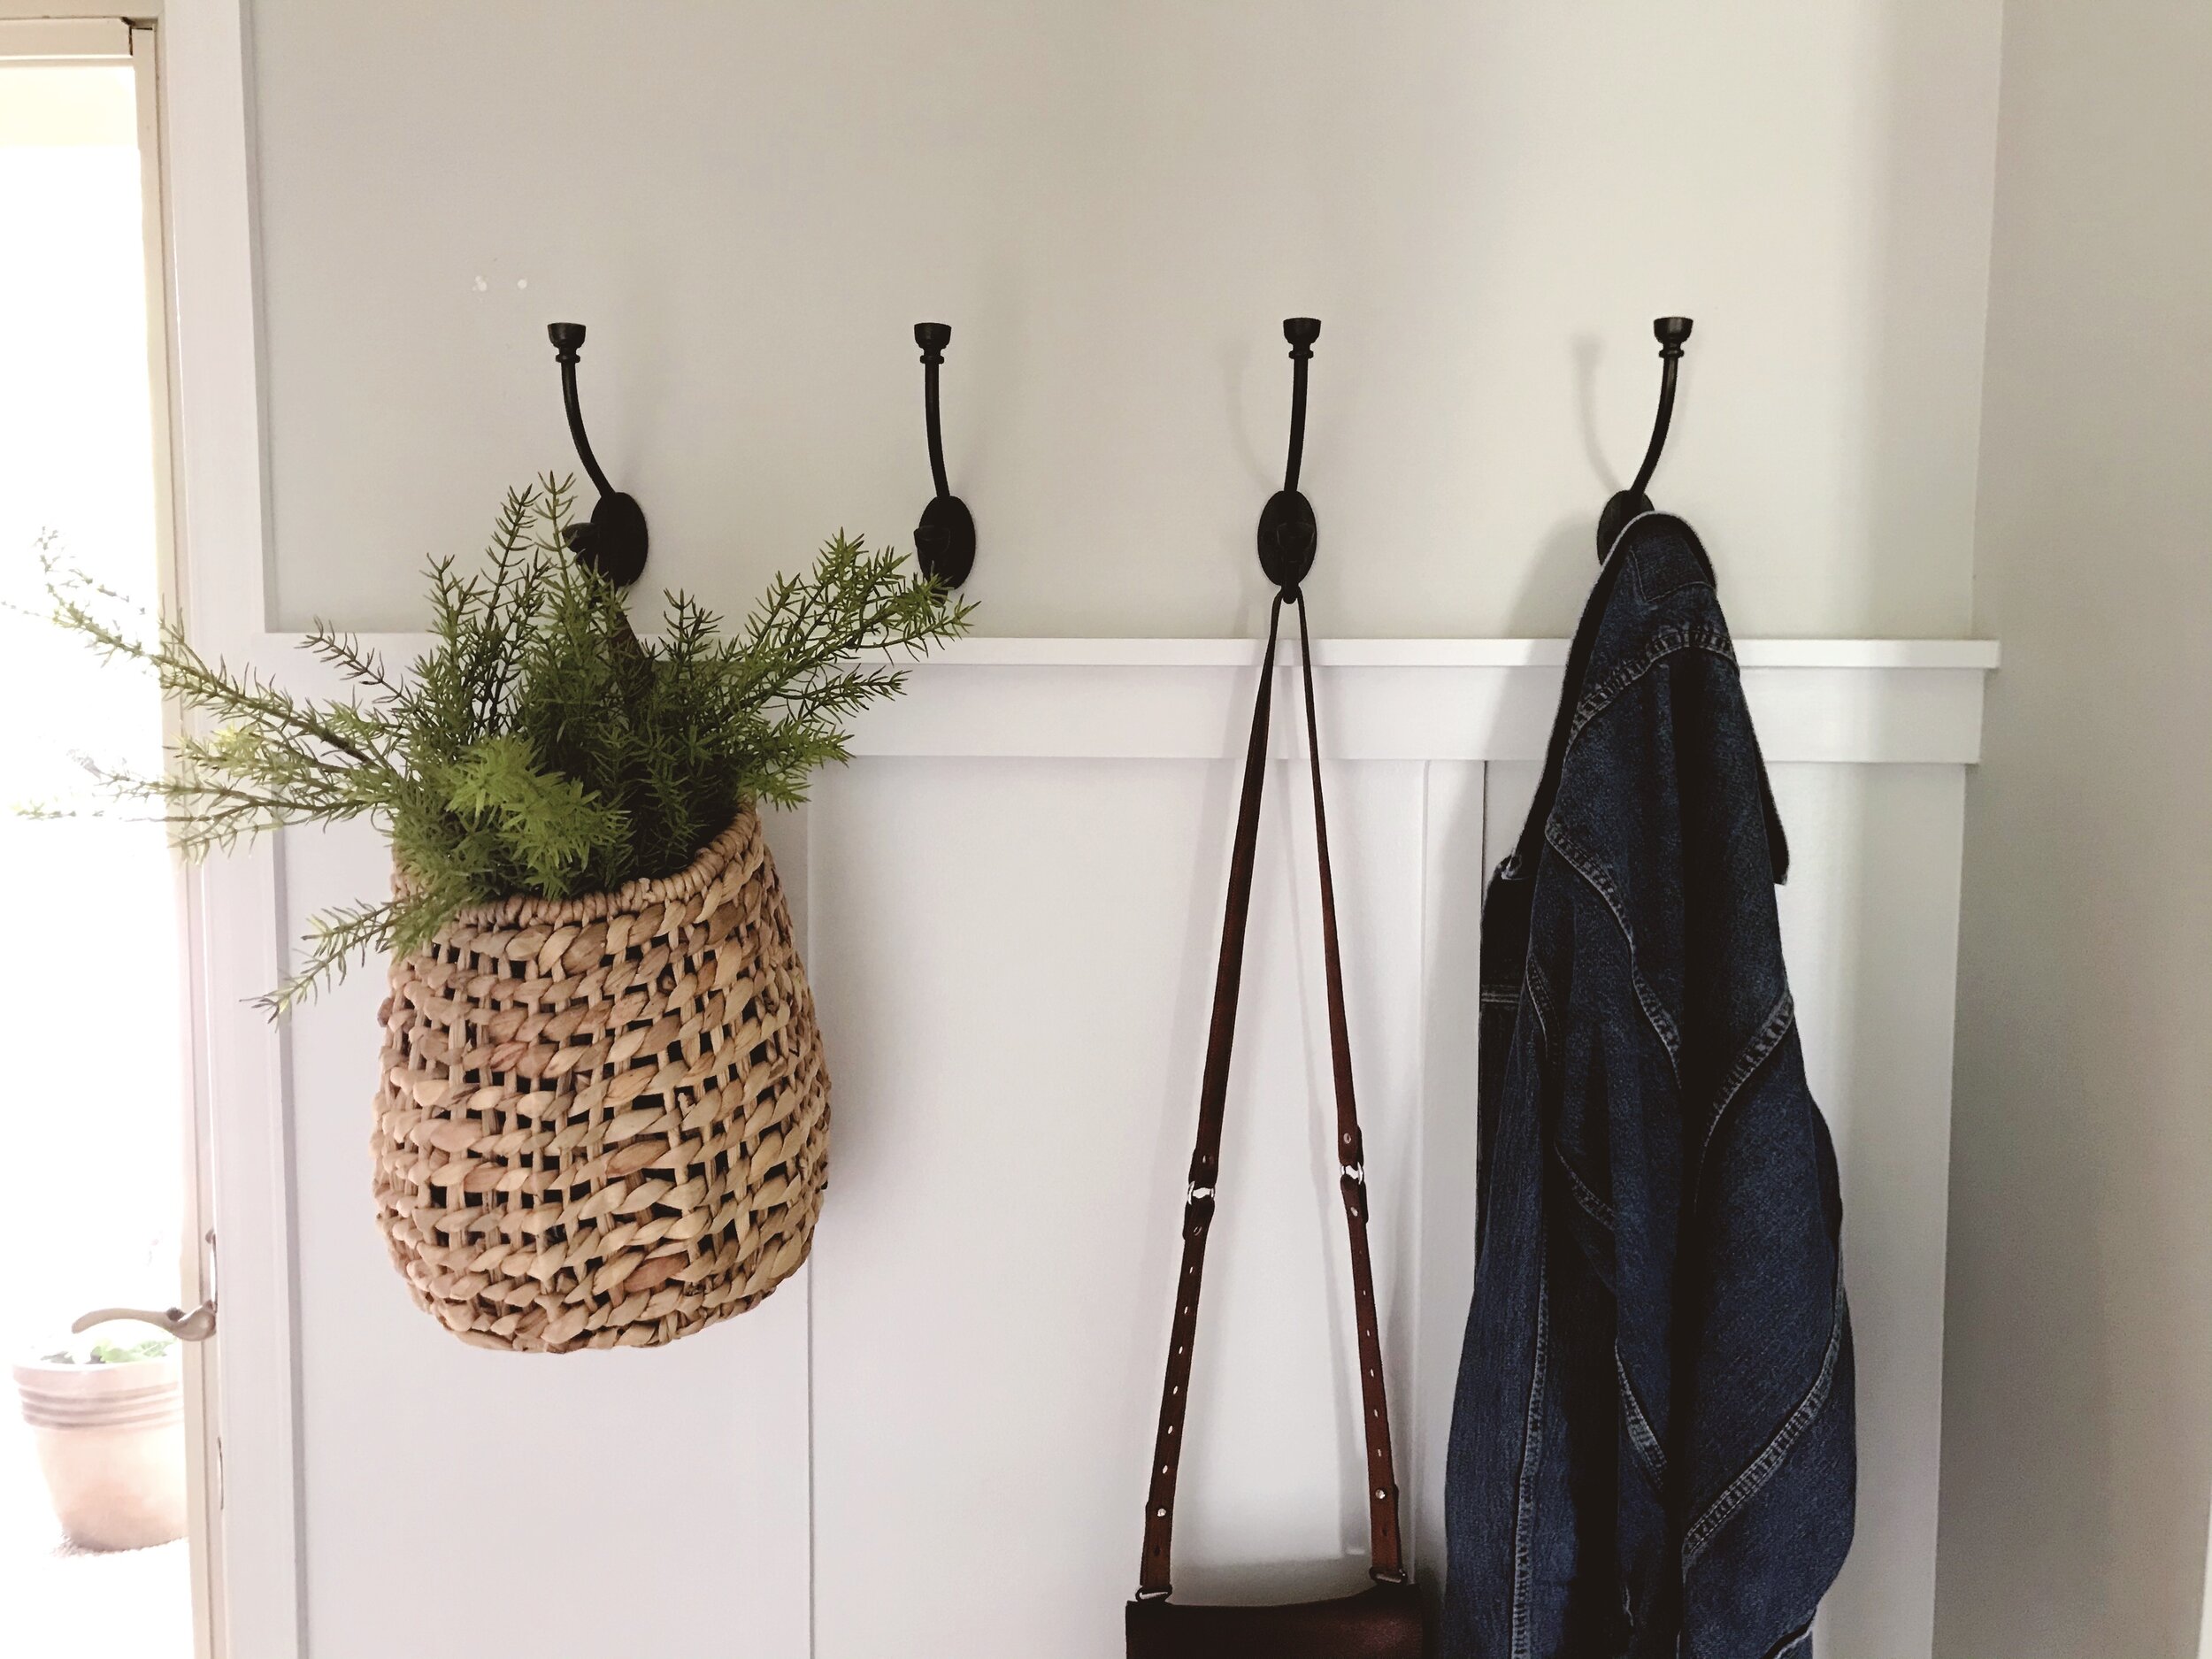
Finally, we finished it off by placing four black Threshold Wall Hooks from Target above the top ledge. This is the part where I thought, “Oh, this is why it’s important to know math.” Getting these spaced perfectly on the wall took some noodling, for sure. I also added the hanging basket from Target to hold our dog Truman’s leash and waste bags (the greenery is just for the photo and unfortunately isn’t permanent. ha!). We literally use the basket every single day. It is so practical!

And that’s it! This project was relatively easy (says the person whose husband did most of the work), and it was a drastic improvement to our entryway. No more coat tree taking up unneccessary space! And I absolutely love the look of it.

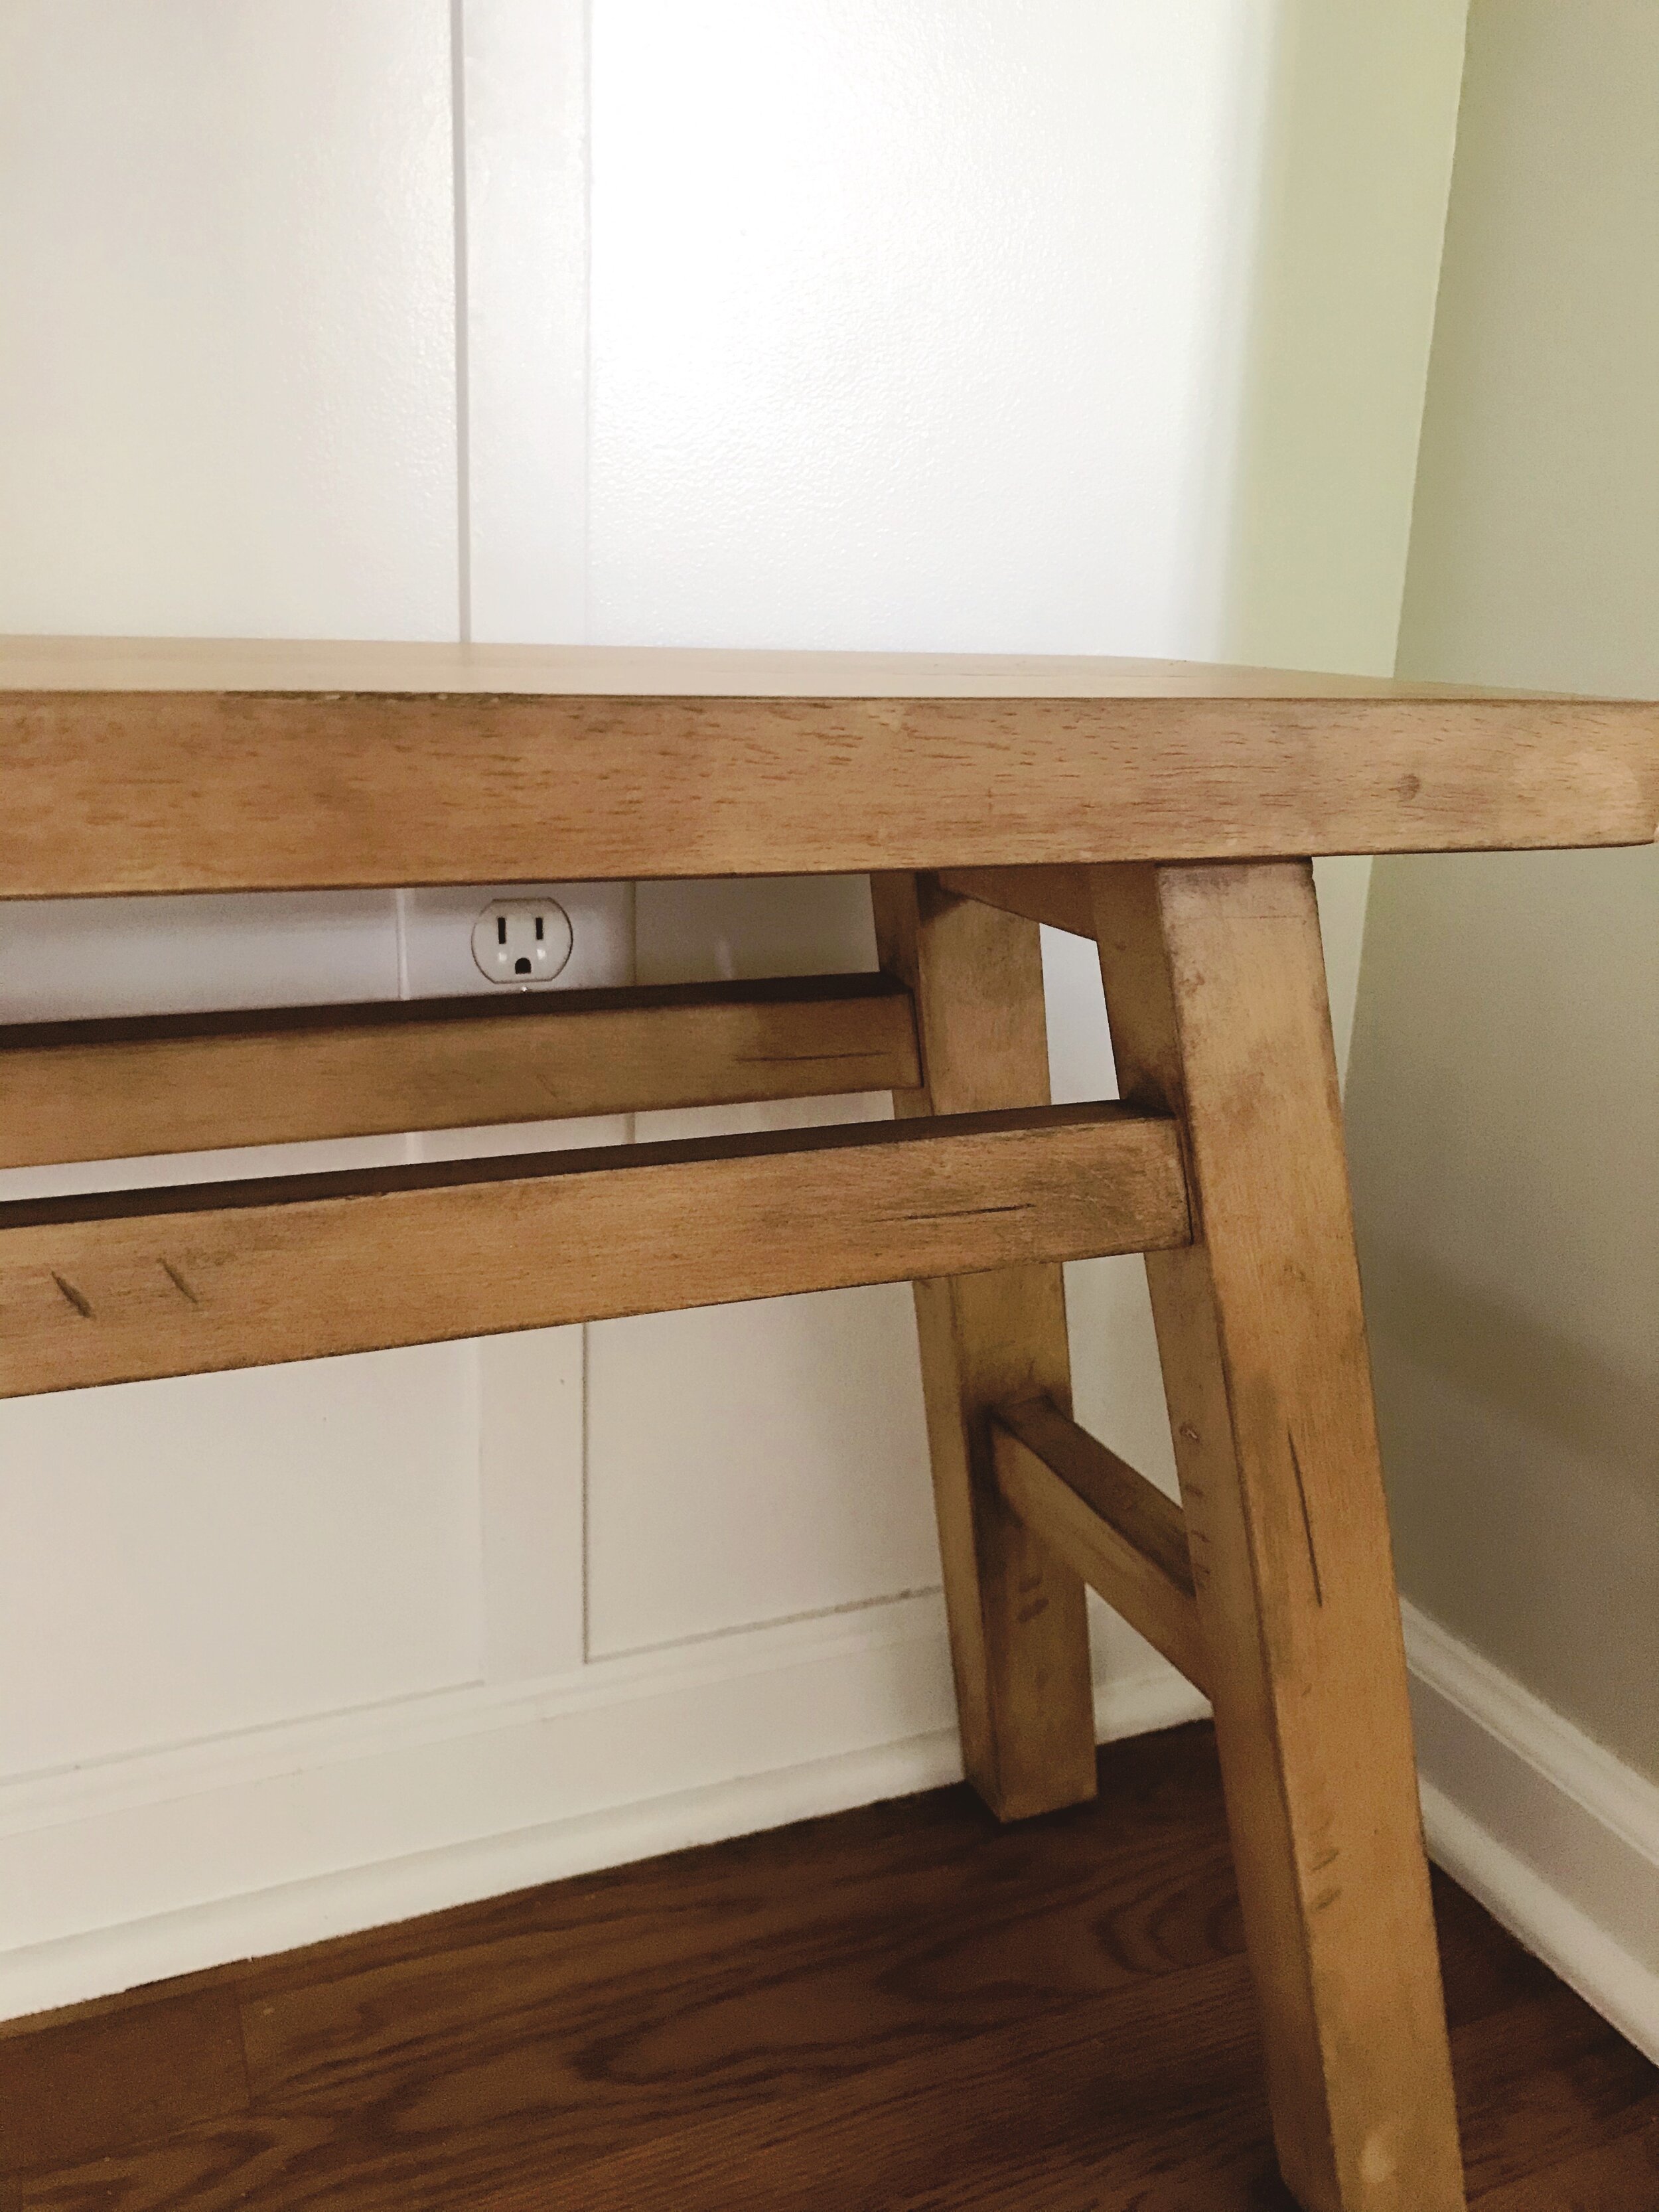
Shari (who dreamed up Cottonwood Styling) and her husband gifted us the beautiful Threshold Studio McGee bench for our nineteenth wedding anniversary! Seriously, the sweetest! It is the perfect spot to sit and tie your shoes!

Of all the home updates we’ve done over the years, this entryway is probably one of my favorites. And honestly, the most expensive part were the wall hooks, which weren’t that pricey at all! And, of course, it doesn’t stay this tidy all the time (okay, almost never), but it does keep the jackets, bags, and shoes a little more contained. And for that, I am so, so happy!

Click through the photos below to see the progress and finished entryway shots!

Favorite Studio McGee Decor at Target

Studio McGee_Target_Decor.jpg

I was so excited to hear about the new line at Target from Studio McGee, in collaboration with Threshold! All of the items are absolutely gorgeous and I wanted to buy ALL OF THEM!

Check out some of my top picks that are linked below:

  1. Decorative Natural Wooden Vase

  2. Woven Cotton Throw

  3. Open Weave Square Natural Basket

  4. Framed Canvas with Molding Antique

  5. Faux Citrus and Eucalyptus Wreath

  6. Ceramic Textured Cream Bowl

  7. Faux Fern Plant in Ceramic Pot

  8. Woven Plaid Gray Pillow

  9. Natural Wooden Bench

Curate a beautiful look anywhere by layering decor with different heights, shapes & sizes.
— Shea McGee


Pie Safe Refresh

ACS-0293.JPG

Last year I was looking for a cabinet for my dining room to store art supplies, extra home decor that I wasn’t using, and basically anything else I wanted to hide away (like that giant tub of my son’s Skylanders figurines). I searched for cabinets online and fell in love with several, but I didn’t want to spend a ton of money.

So, I decided to search Facebook Marketplace to see what I could find. I looked for weeks with no luck, but finally I came across a pie safe for just $75. The only thing was, it was an orangey oak and I wasn’t sure how I would make the wood pretty without painting it. But Shari, my super crafty teammate at Cottonwood Styling, told me about the Java Gel Stain she used on her oak banister, and I thought I could give it a try.

So I picked up the pie safe, a plastic dropcloth, and a bag of old staining cloths. And when the gel stain arrived from Amazon, I got to work.

I taped off the tin panels on the doors, but I left the doors on while I worked. I didn’t want the color to be too dark—just a little more antique-looking—so I knew I would need to work in small sections. I started with the top and worked my way down the front, one door at a time. Then, I did the sides and back. I applied the gel stain with the staining cloths, allowing it to sit for ten minutes or so. Then I wiped it off with a clean cloth. I did this until I figured out how long I would need to keep the stain on to get to the color I wanted.

It was actually pretty easy. I applied two coats of the stain, then I added a topcoat of clear finishing wax, like you use with chalk paint.

Finally, I finished it off by replacing the wood knobs with black ones.

Overall, I was pretty happy with the result. It’s functional, it’s the size I was looking for, and it hides all the stuff I don’t want cluttering my house!

Favorite Hardy Houseplants

IMG_0910.jpg
Snake_Plant.jpg

Mother-in-law’s Tongue (Snake Plant)

Simply water when the soil is dry. For most of them that’s about once a month. So easy!

Pothos.jpg

Pothos

This attractive vine plant loves bright, indirect sunlight and won’t completely die if you miss a watering. Best of all, they are said to be great for air purification!

ZZ_Plant.jpg

ZZ Plant (Zamioculcas Zamiifolia)

Both low light and drought tolerant, this is the easiest plant to care for. Sometimes you’ll forget this plant is even real because it grows slow and requires very little attention.

Alove_Vera.jpg

Aloe Vera

The care is pretty simple as long as you keep the watering to a minimum and ensure there are drainage holes in the pot. You might want to keep one near the kitchen in case of burns.


Textile Framed Art

Photo of framed duck cloth fabric from Hobby Lobby above bed.

Photo of framed duck cloth fabric from Hobby Lobby above bed.

Last year I came across some framed textile prints from Pottery Barn. I thought hey, I have a couple of frames on hand…why not try a little DIY project? The next day at Hobby Lobby I found the perfect duck cloth fabric to go in the frames. Oftentimes I forget to even look at the fabric at Hobby Lobby because they have so much decor! I also want to note that they have a great selection of cushion covers. I’ve purchased at least half of dozen of them in the past year. These days I will not buy a throw pillow unless it has a zip off washable cover, because I have boys and a dog, but I digress.

When I was at World Market the other day, I saw this Circle Print Morgan Napkin and loved the print! It had a cool mid-century vibe that spoke to me, but I knew the dusty rose color wouldn’t work with my table setting. Then I remembered the textile prints I had previously done and knew that I had two brass Project 62 frames from Target that would make great textile framed art pieces. I’m a fan of coordinated color and mixed patterns, so I chose the Coral Floral Block Print napkin to pair with it.

The entire project with the fabric was less than 20 bucks. Of course if you have frames and fabric on hand, you could whip this these up for free. This would also be a great way to display an heirloom such as a handkerchief or vintage linens.

Whatever you decide to display, I hope that it brings joy to your home! xoxo

Photo of framed World Market cloth napkins above desk area.

Photo of framed World Market cloth napkins above desk area.

Favorite Hearth & Hand Spring Decor Items

Hearth&HandSpringDecorTarget.jpg

Spring less than a month away. It’s almost time to start mapping out the long list of chores for spring cleaning. It also a good time to freshen up the decor with soft neutrals and greenery. Target is my go-to for a nice home refresh that doesn’t break the bank (especially after I’ve spent all of my pennies on new plants). 🌿

Here’s the round up of some of our favorite Hearth & Hand Spring decor items!

  1. Ceramic Bud Vase Sour Cream

  2. Oversized Carved Wood Tray

  3. Throw Blanket Multi Stripe

  4. Shaker Accent Stool Black

  5. Ceramic Candle Sea Salt & Lavender

  6. Faux Common Fig Stem

  7. Glass / Metal Vase Brass

  8. Half Circle Braided Coir Mat

  9. Hand Towel

Mini Makeover with Removable Wallpaper

Removable Wallpaper Makeover

Who knew that I would ever be a fan of wallpaper? I grew up in the era of overdone and tacky wallpaper! Not only was it on every single wall, it also had a border with a different pattern that ran across the top too. To be fair, the look was very popular back then. Luckily we’ve come to realize that moderation is key.

Over the past few years wallpaper has made a comeback. I’m so glad they now have peel and stick options for those who are renting or have commitment issues, like me.

It only took an hour or so to install the Geometric Pell and Stick Wallpaper from RoomMates. The online instructions are very thorough. For best results take your time. If you do find yourself in a rush because you are going to be late for school pickup or something like that, the wallpaper can easily be repositioned several times.

Good Luck!

Bright White Fireplace Makeover

Fireplace.JPG

The house we live in was built in 2001. Not exactly ancient, but just old enough to look dated. When we moved in, one of the things that really bugged me was the beige tile in the bathrooms and around the fireplace. You can read my previous post on how we tackled updating the bathroom floors. The fire place is the focal point when you walk in. I knew it needed a little something extra to spruce it up.

Thank goodness for Pinterest! It's the 'been there, done that' of all things DIY related. It is also good for when you get a harebrained idea like, "I wonder if I could paint the fireplace tile"? Sure enough, you can! Thankfully, Heather from Setting for Four wrote a nice detailed blog about it. I followed her instructions to a “T” and it turned out fabulous! I even had enough white tile paint left to pass along to my neighbor so she could update her fireplace.

Friends, the moral of this short story is you don't always need a huge budget to accomplish updating your home. There are tons of small things you can do over time with a little elbow grease and some creativity. 

Click here if you want to take a look at what the fireplace looked like before.

Easy Update for an Oak Banister


Stairs.JPG


Friends, I hope you've all had a lovely week so far. My hope is that were you inspired last week by the previous post to tackle your grout, and now you have bright and shiny bathroom floors. Let's jump in and talk about another 'dirt cheap' update for your home which is the banister. Prior to the year 2000, it seems like a lot of homes were made with oak banisters, oak cabinets, oak floors.  A whole lot of orangey oak throughout the house. I realize it may not be feasible to change all of the oak, but this update will definitely break up the monotony of it throughout your home. 

When I was originally contemplating changing the banister, I thought about painting it all white, or maybe just black, but then I decided that I wanted to keep the texture of the wood. I came across this awesome how-to post from Naptime Decorator and jumped right in and purchased the Java Gel Stain from Amazon. I bought a half pint and had plenty left over. This project took about a day and a half to complete (once you factor in drying times). And the best part was the minimal amount of sanding I had to do! 

I wish I had taken a 'before' picture, so you could see the orangey oak. But like I said, I jumped right in. I was so excited to tackle this project and I still get giddy when I walk by and see the beautiful results. The General Finishes Java Gel Stain is so easy to work with. I look forward to using in on future home and furniture projects!